Integrating ServiceNow with jira using Jira Spoke to support an POC
A simple proof of concept to integrate ServiceNow <--> Jira


Table of contents
- High-Level architecture
- Install Jira spoke application in ServiceNow
- Create a new ServiceNow field
- Setup in Jira
- Flow designer in ServiceNow - ServiceNow --> Jira
- Walkthrough of flow
- Create a Webhook in Jira and configure it in ServiceNow
- Create a subflow to process the WebHook events
- Testing the integration between ServiceNow <--> Jira
- Testing the subflow
Proof Of Concept
High level architecture
Setup Jira spoke application in ServiceNow
Creating API token in Jira
Create a Webhook in Jira
Setup Jira routing policies in ServiceNow
Creation of a flow in Servicenow
Creation of Subflow in servicenow
Two way test between systems
Imrprovements
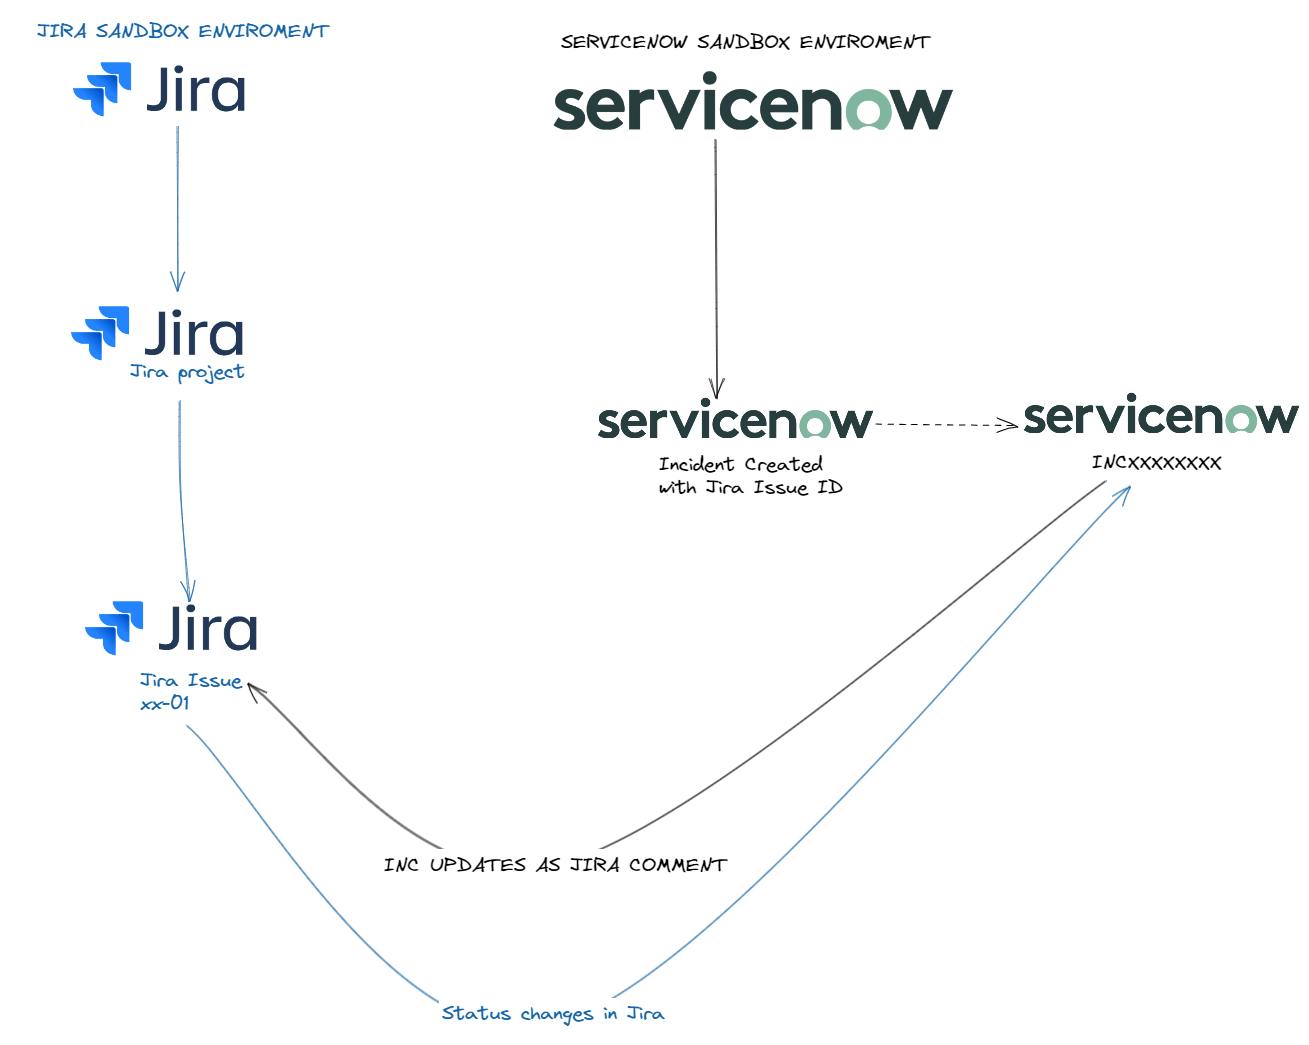
High-Level architecture
To help unstrand the functional architecture we will use ServiceNow as the master, and Jira as more of a supporting tool to help us share data between Jira Issue and ServiceNow incidents bi-directional. The Jira issue key will already exist, and we will create an incident based on the inputs from the Jira issue to trigger the integration.
Install Jira spoke application in ServiceNow
If you are unsure where to get a sandbox environment for ServiceNow, you can create a user account here ServiceNow Developer account and spin up an instance on the latest version of ServiceNow, in my example, I use ServiceNow version Tokyo. The good thing here is that it's no need for any prerequisites to do this setup, of course, it helps to know the Incident module, but on the admin part, it's relatively straightforward.
Navigate to your ServiceNow instance and search for Applications, then navigate to all --> search for "applications" --> under system application --> click all

When the all application window is loading, install the Jira spoke application and verify the state is installed.
Next up is creating the credentials in Jira to create an established connection between the two systems (see point 1 in the Setup in Jira )
Create an API token in Jira --> copy the token --> navigate to credentials in ServiceNow

Click New in the top right corner --> select basic authentication --> enter a generic ServiceNow name for the credentials --> add the Jira Username --> add the Jira API token in the password field and click submit.

Once credentials are created we can go ahead and create the outbound connection by clicking connections and creating a new connection and choosing HTTP(s) Connection from the provided options. Provide the following details for the outbound HTTP(s) connection and press submit:
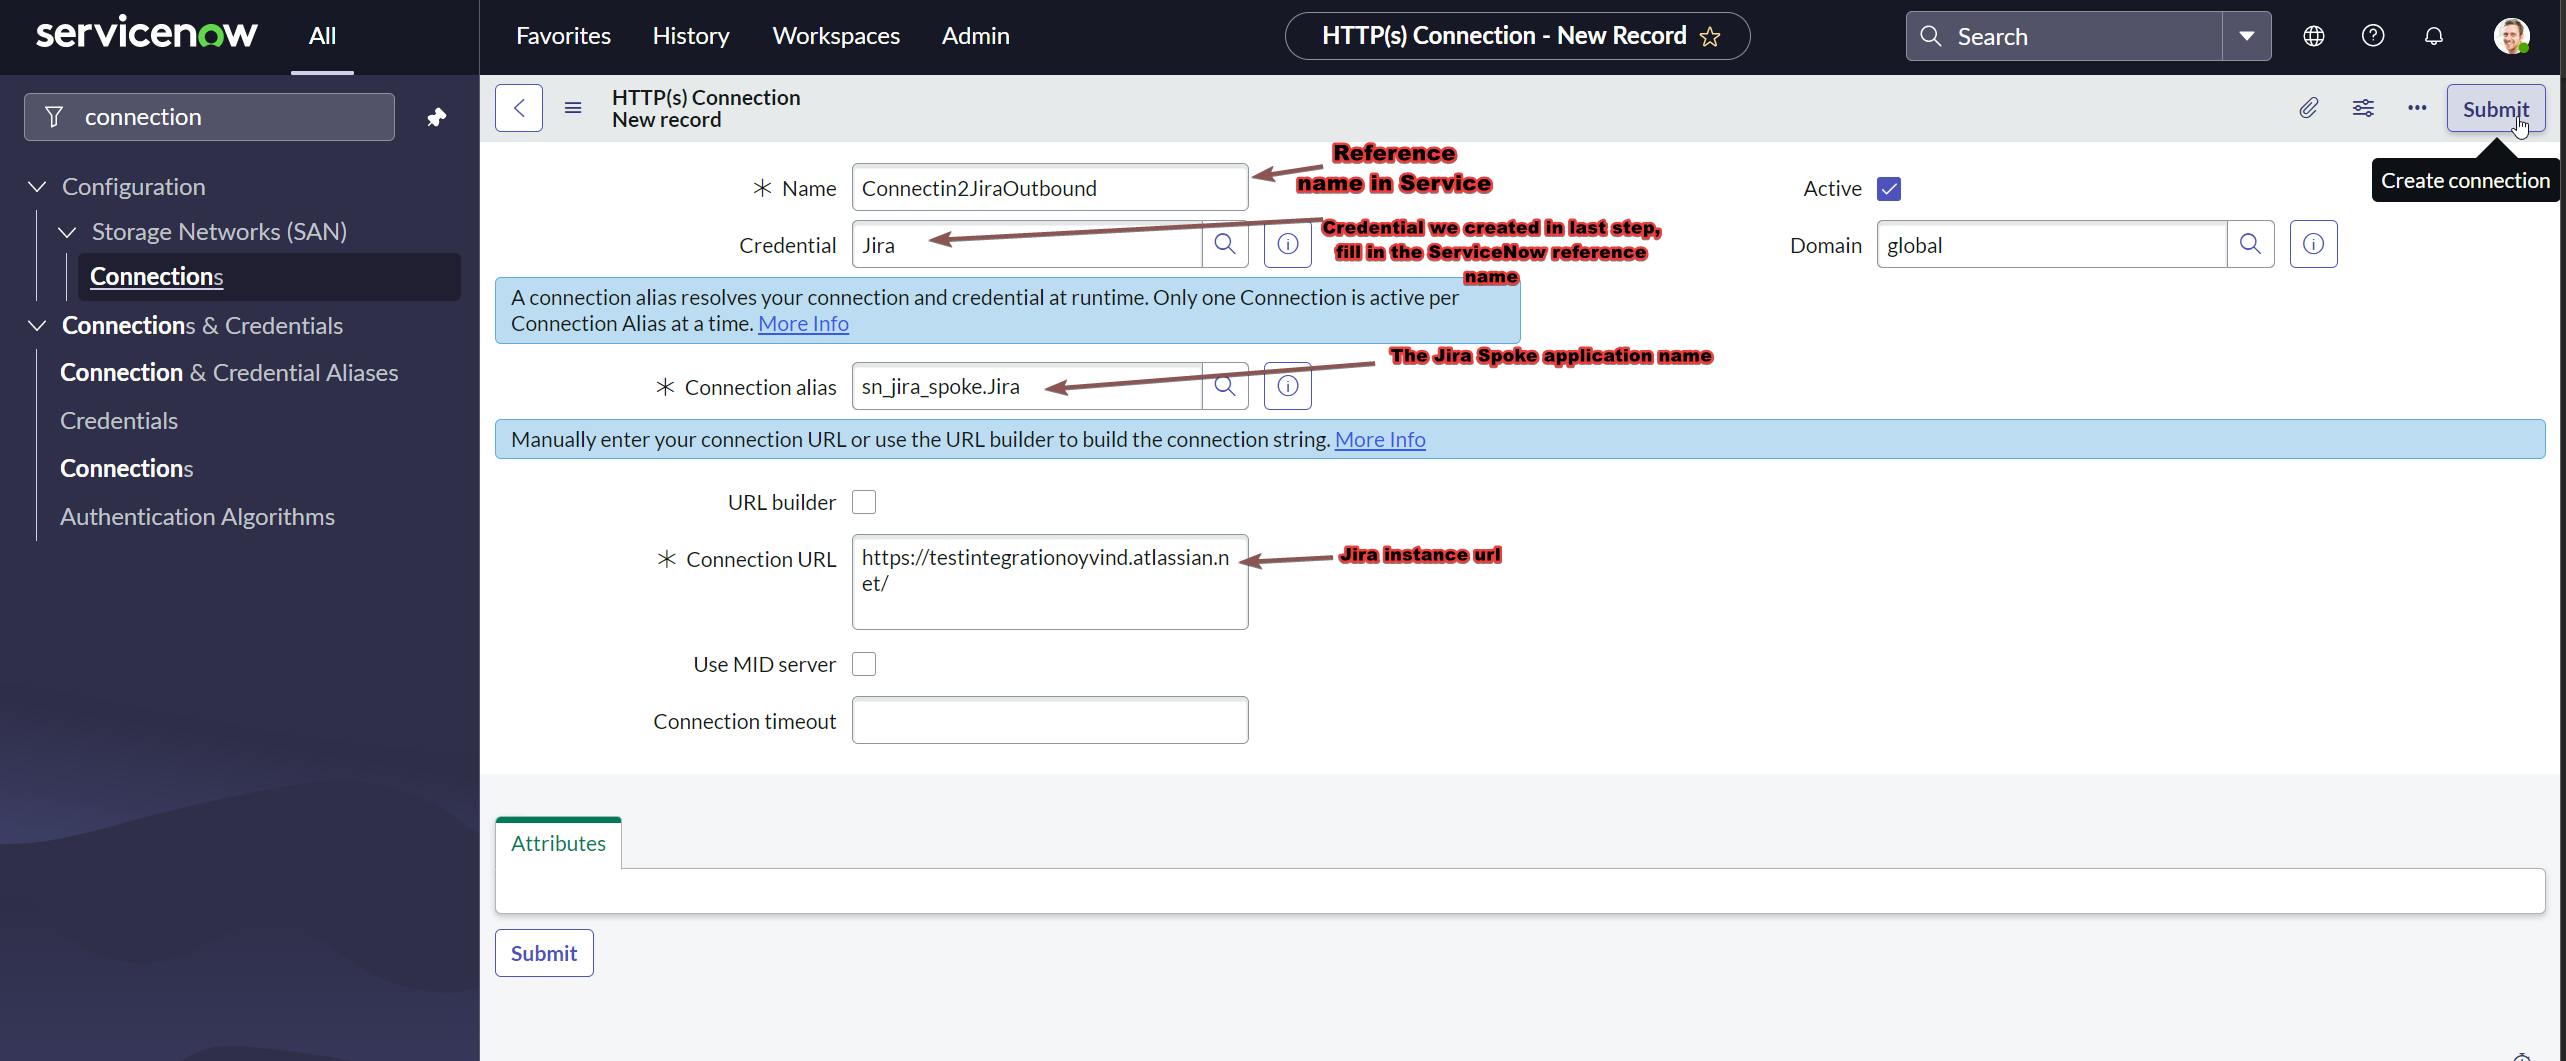
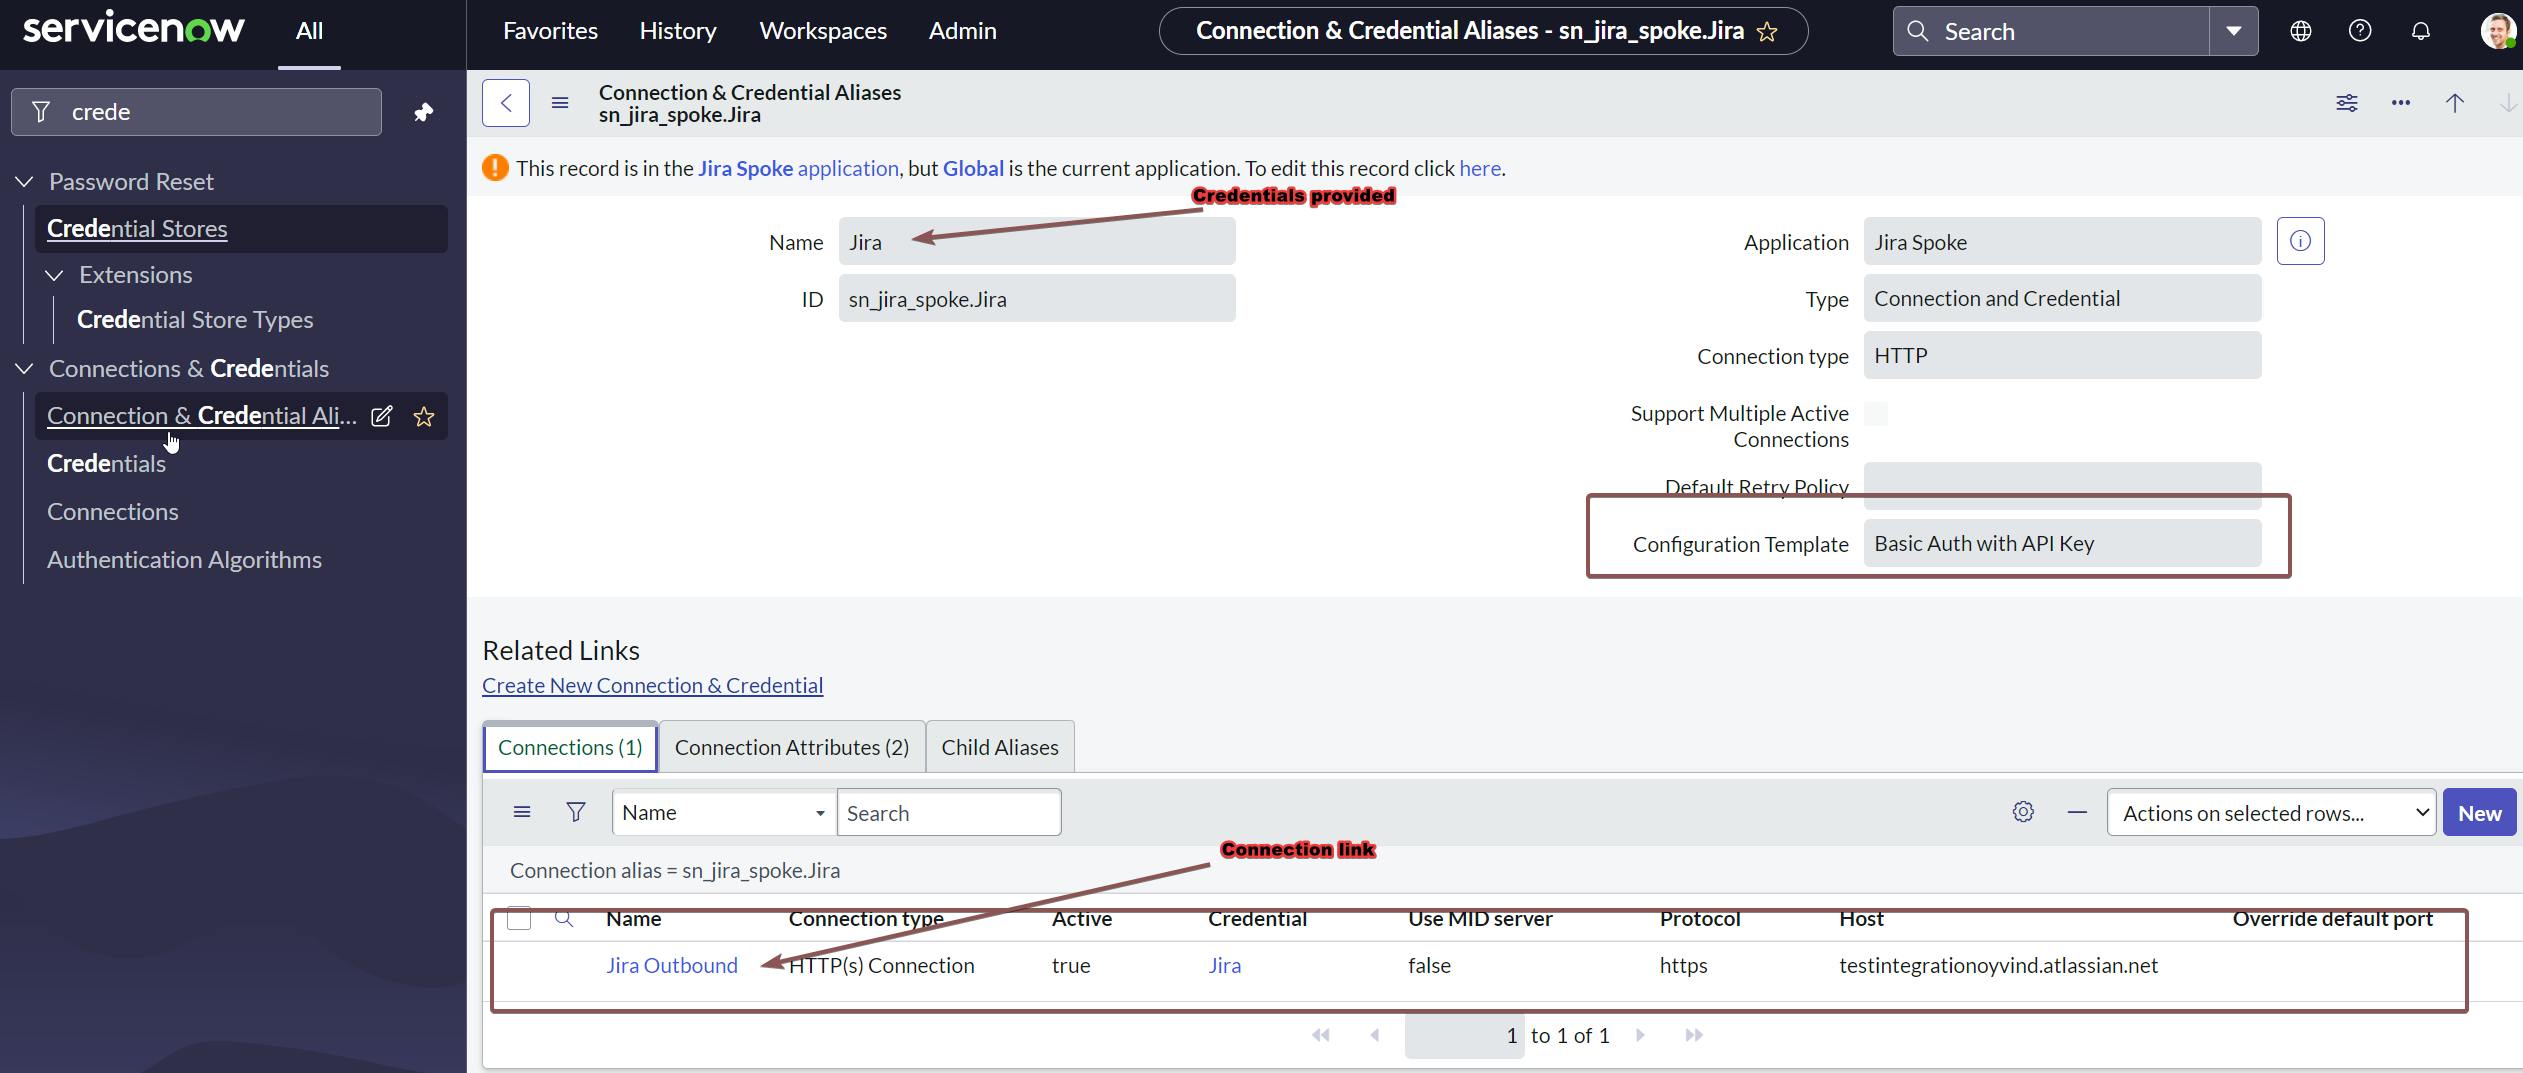
To verify our setup in ServiceNow we can navigate to Connection & Credential Aliases and see if ServiceNow object exist with highlighted values.
Now that everything is set, ServiceNow Jira spoke application will be able to send ServiceNow-related data to Jira.
Create a new ServiceNow field
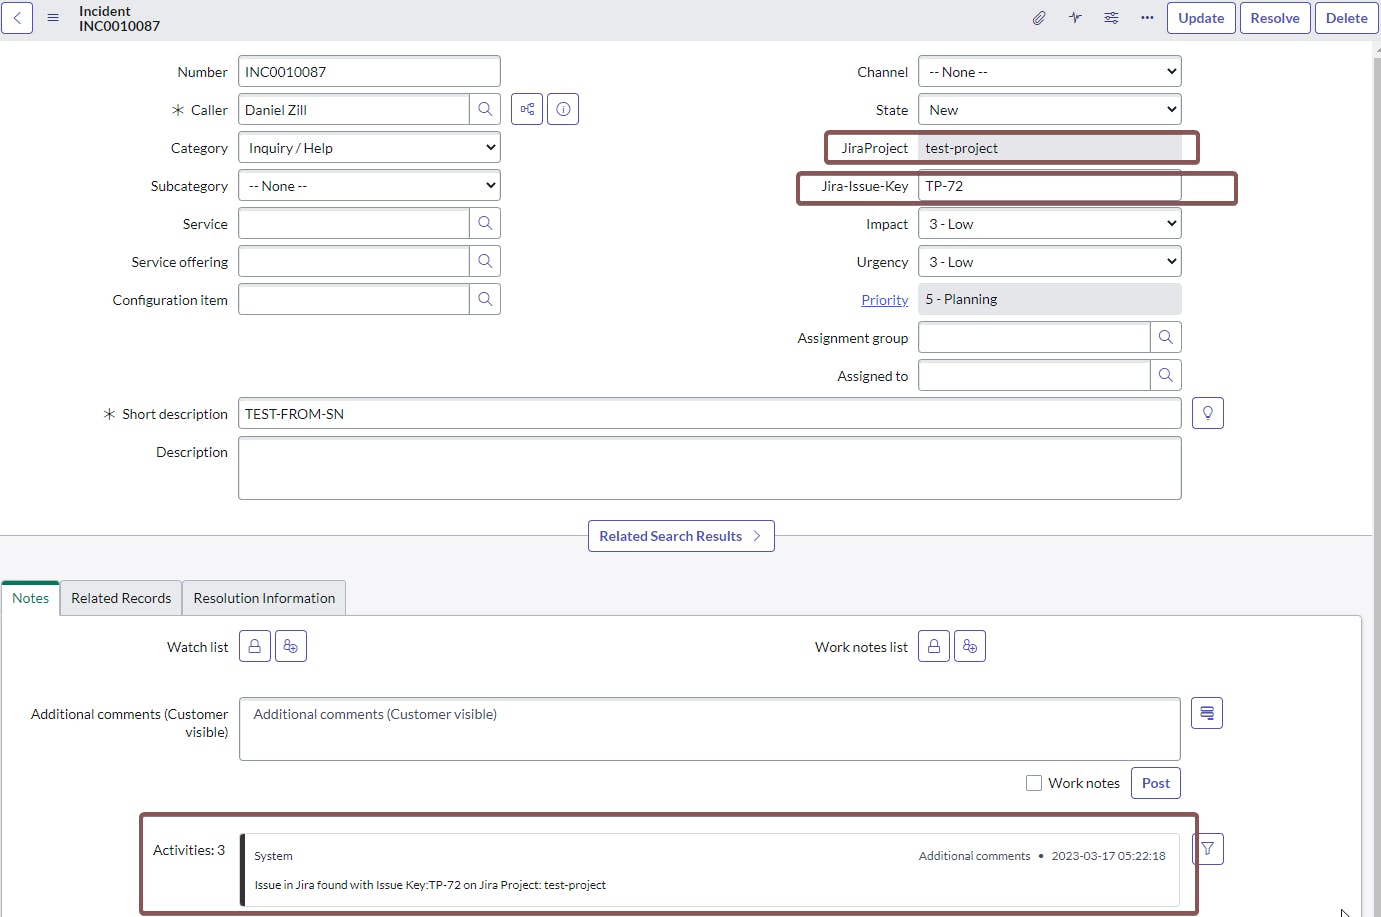
As we are using the incident module in ServiceNow for reference, we would need to create a new field in ServiceNow that we will use to match the Jira Issue key with the incident we create. This helps us map the actual incident to the Jira issue key. Please remember the Issue key needs to exist before the incident is created in ServiceNow. For this integration, the Jira issue key will already exist.
Start by opening a random incident record, to do so:
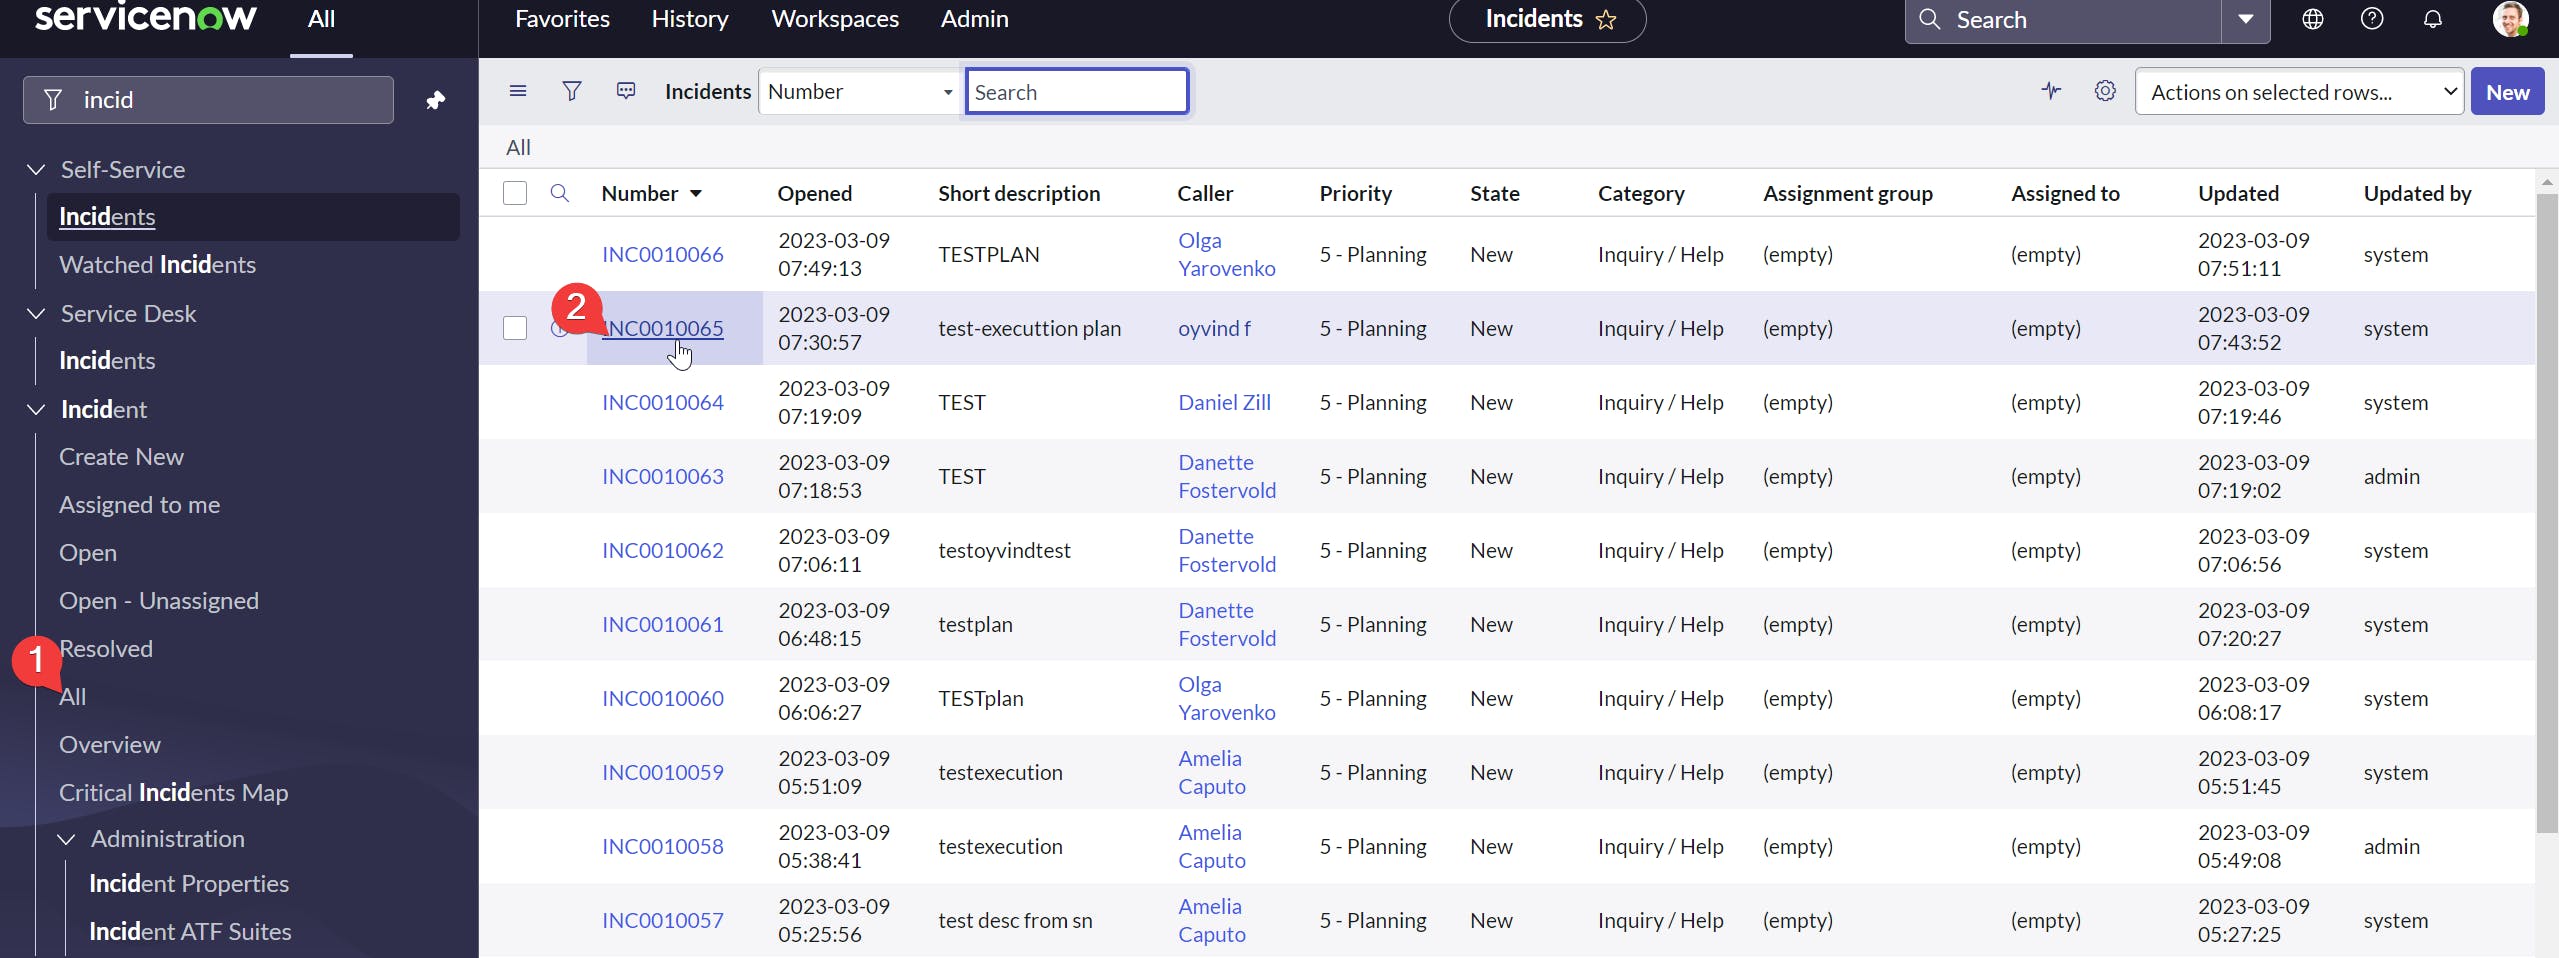
Next up is to right-click in the top light ribbon, from the dropdown list click configurations --> form layout
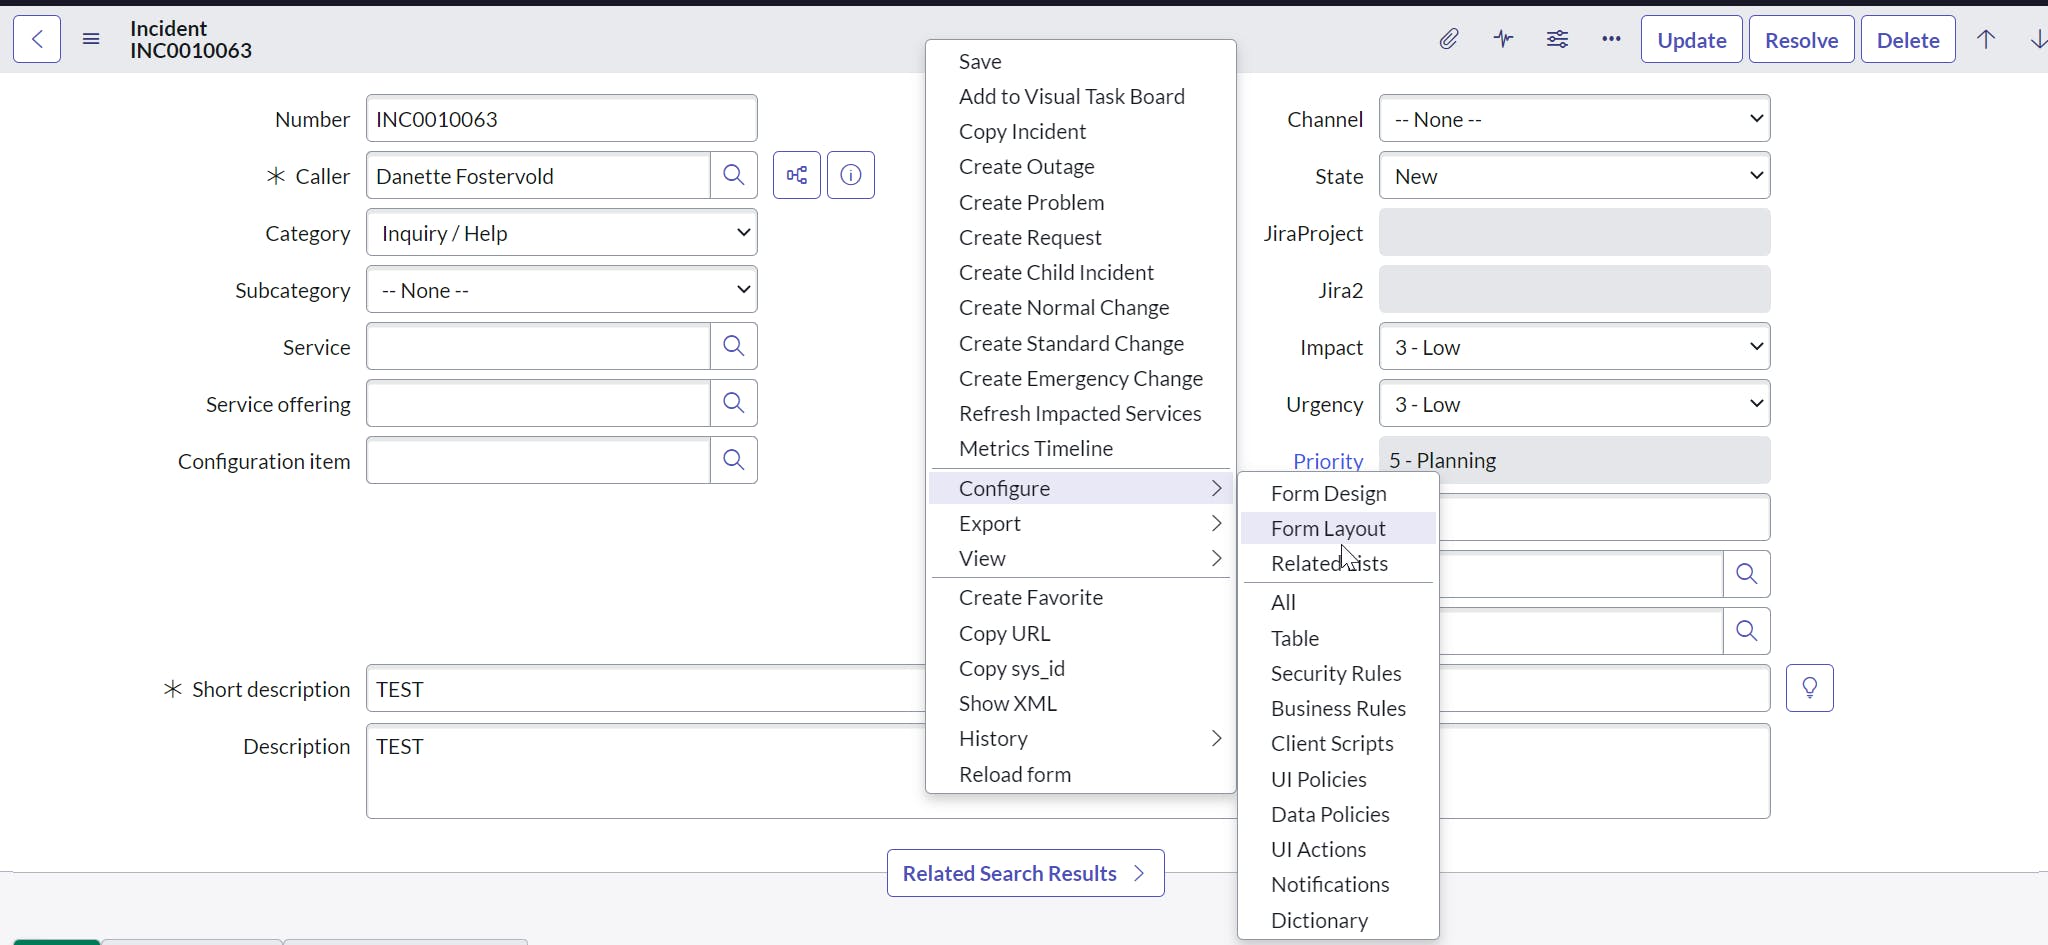
Start by creating a new field and make sure to add it to the selected list. Press save and verify that the newly created field is visible in any incident.

Verify the newly created field if you start by creating a new Incident
Setup in Jira
Start by creating an API token by navigating to Atlassian ID - create an API key
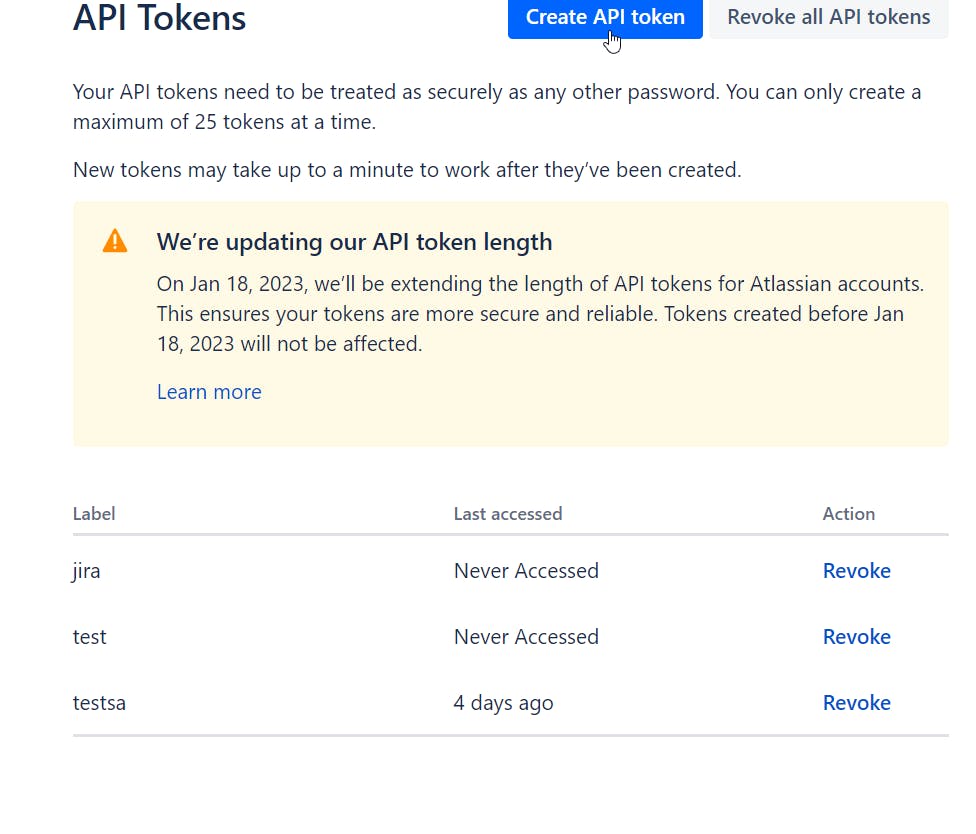
Use the Jira username + API token as credentials in ServiceNow (coming in later stage of this guide)
Flow designer in ServiceNow - ServiceNow --> Jira
ServiceNow flow designer is a low-code tool that helps you create workflow, sublflows that helps automating processes, make integration work easier by providing you with a toolbox of predefined connectors. To get started creating a simple flow + sublflow. You can follow this:
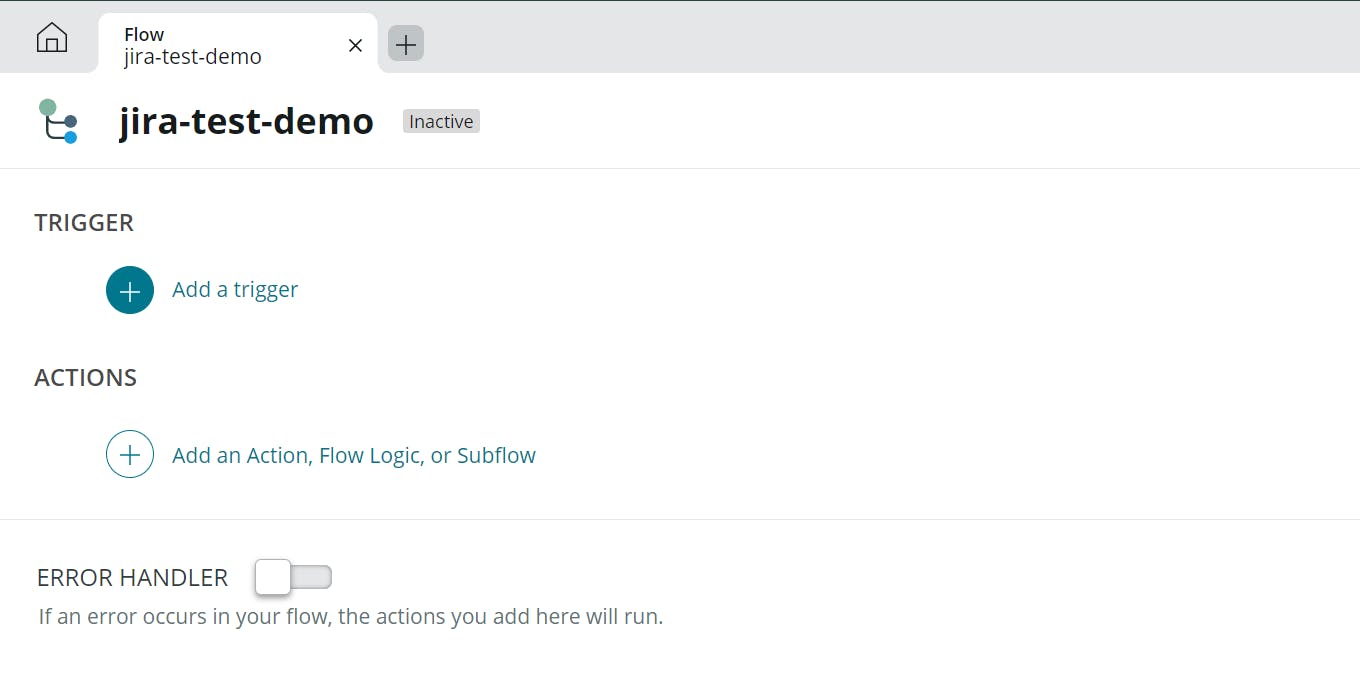
Navigate to your ServiceNow instance and search for Flow Designer. Opening this will redirect you to the Flow Desginer. Start by creating a new flow:


The next step is to add a name, description and make sure you run this flow as System User. Once you click submit you will be redirect to similar page.

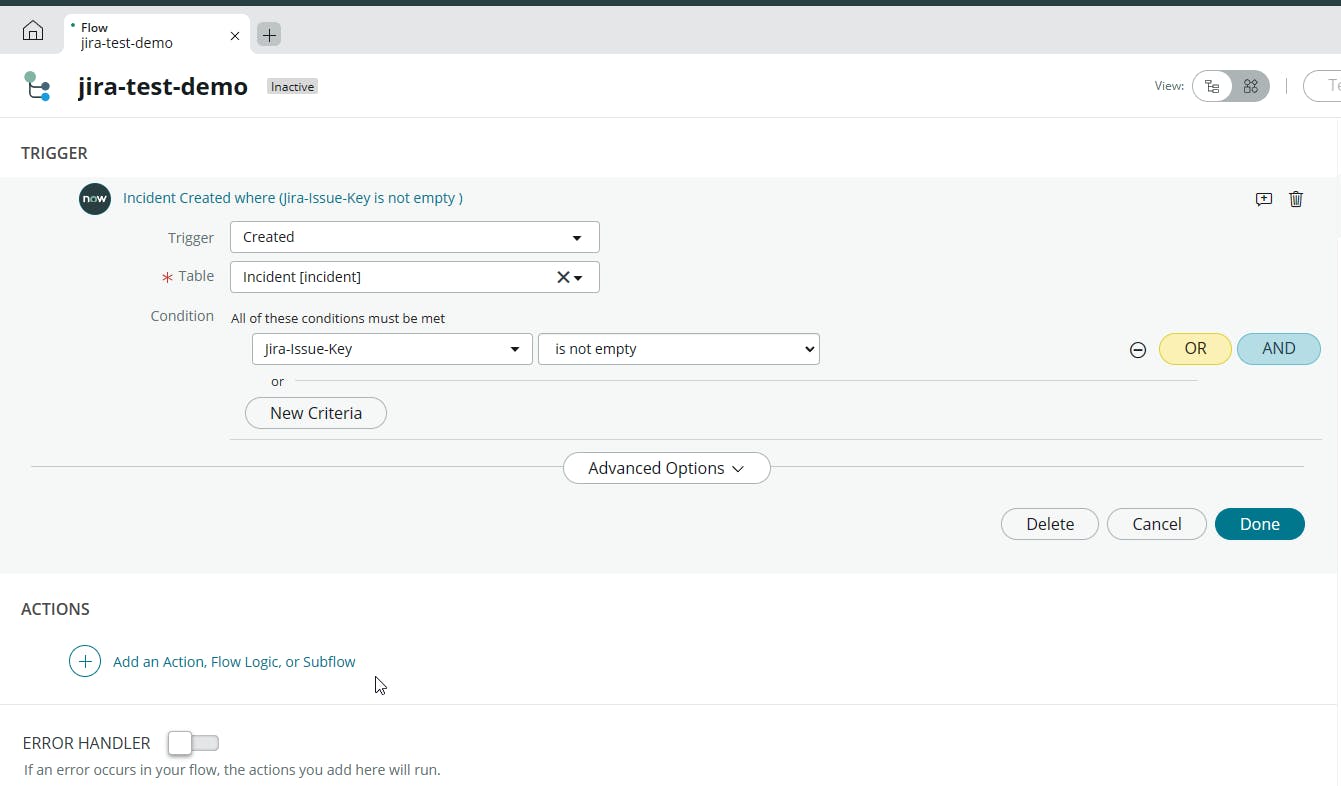
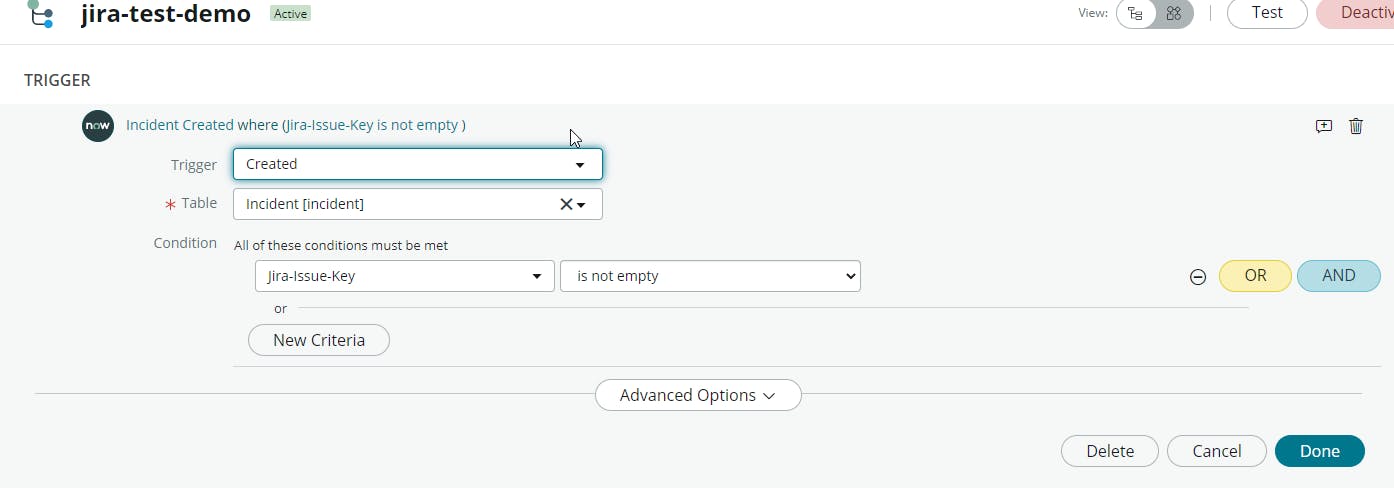
In our example, we will use an Incident created as a trigger. This will trigger the flow jira-test-demo whenever a new incident is created in ServiceNow with the custom field we have in ServiceNow that we called Jira-Issue-Key(explaination later). To add the incident created as the trigger, do the following:
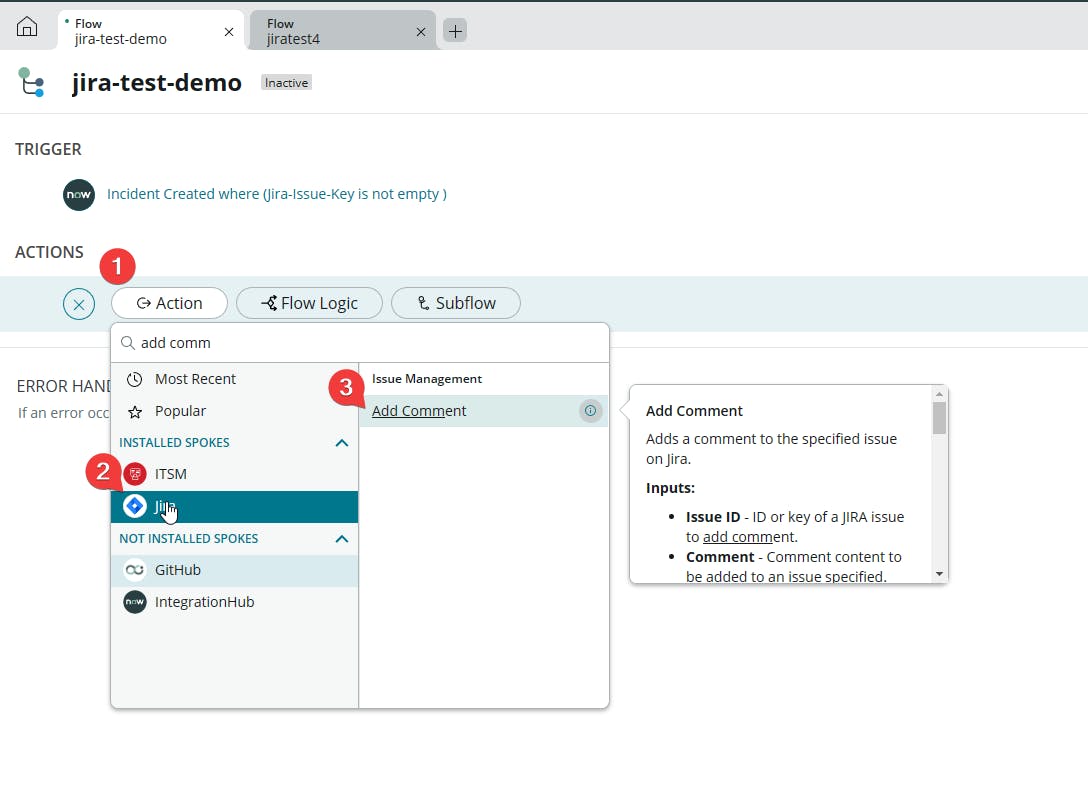
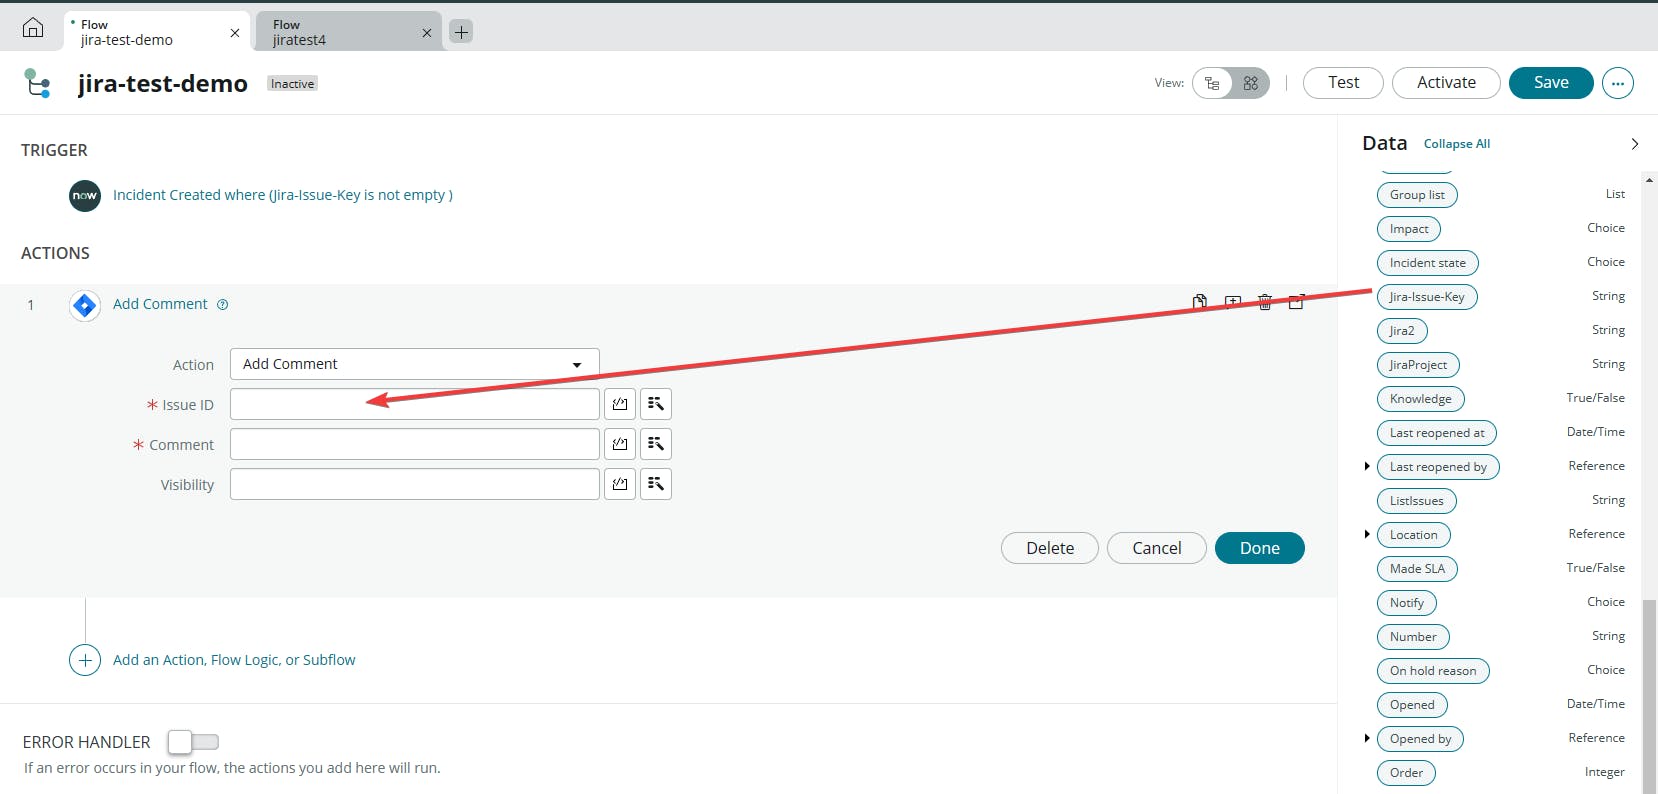
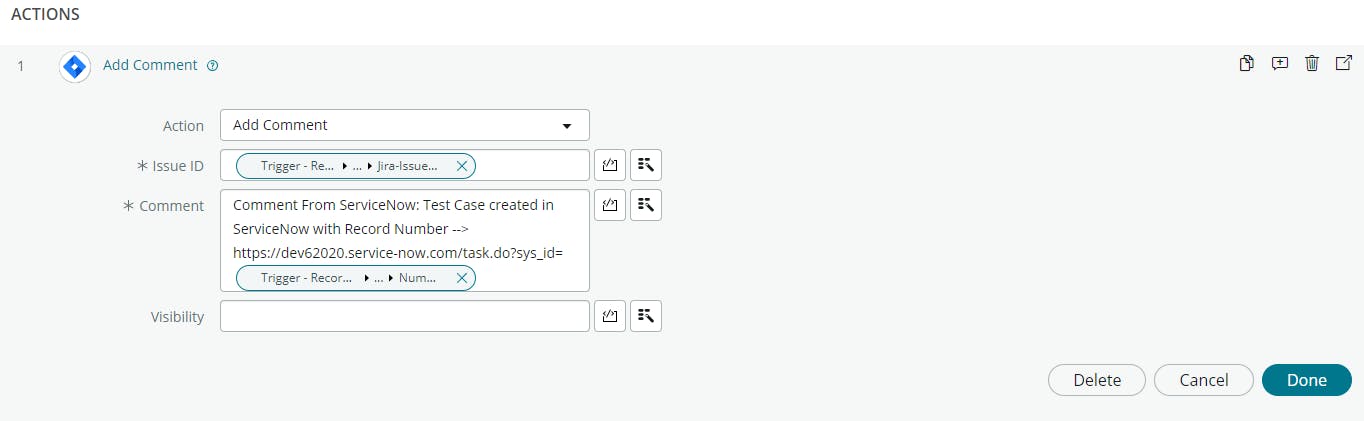
The first action we will add in our workflow is the Add Comment. Purpose and reason why are to map the issue ID we have from the incident(Jira-Issue-Key) to match the issue id in jira within one jira project.
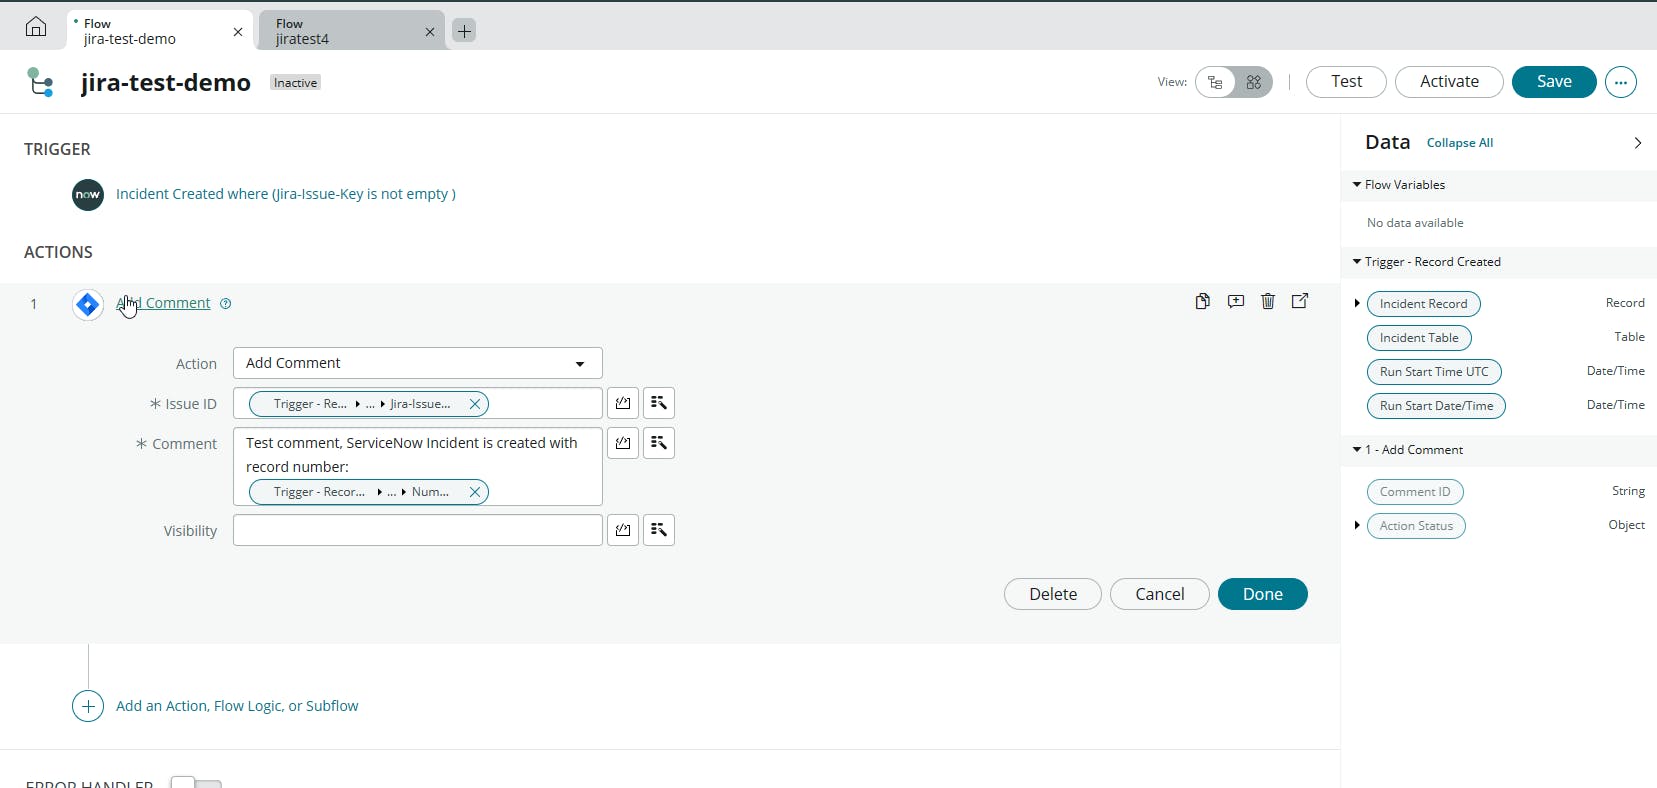
Use the Jira-Issue-key field as the primary key here for mapping the Incident <--> jira issue. The data fields in the right side is where you really can create the value, by combinding ServiceNow fields as jira inputs. Next provide an comment you would like to be posted to the specified Jira issue.
Example of the comment action. We can test if this is working by activating our flow.
In addition to the first action, I will verify the jira comment get posted by updating the comment field on the concrete incident we need to create.

Click save, then activate. Next up is to test if the demo flow works.
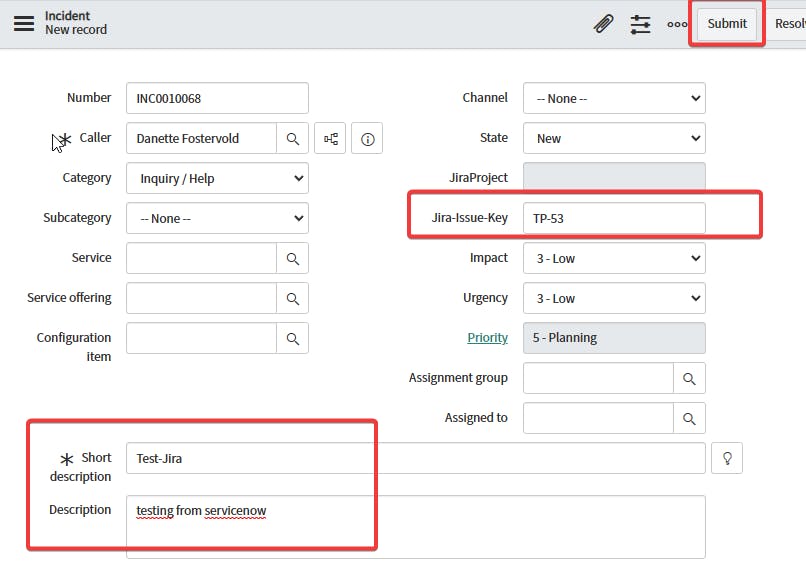
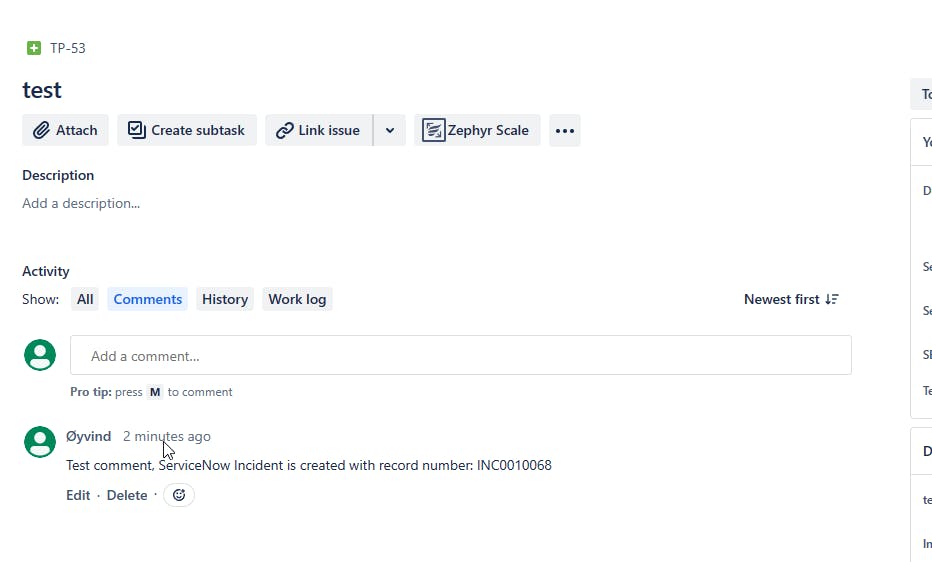
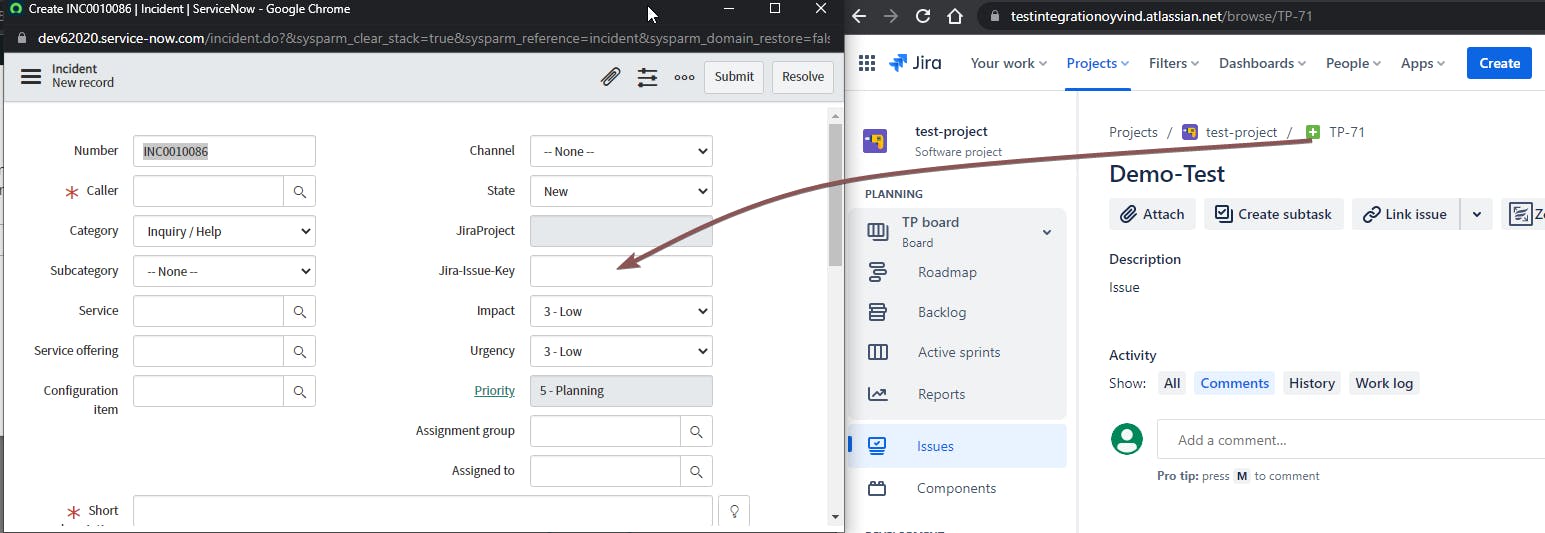
In the custom field we created, go into jira and find an existing issue, copy the issue id. e.g TP-53, and write it in the Incident Module:

click Run Test
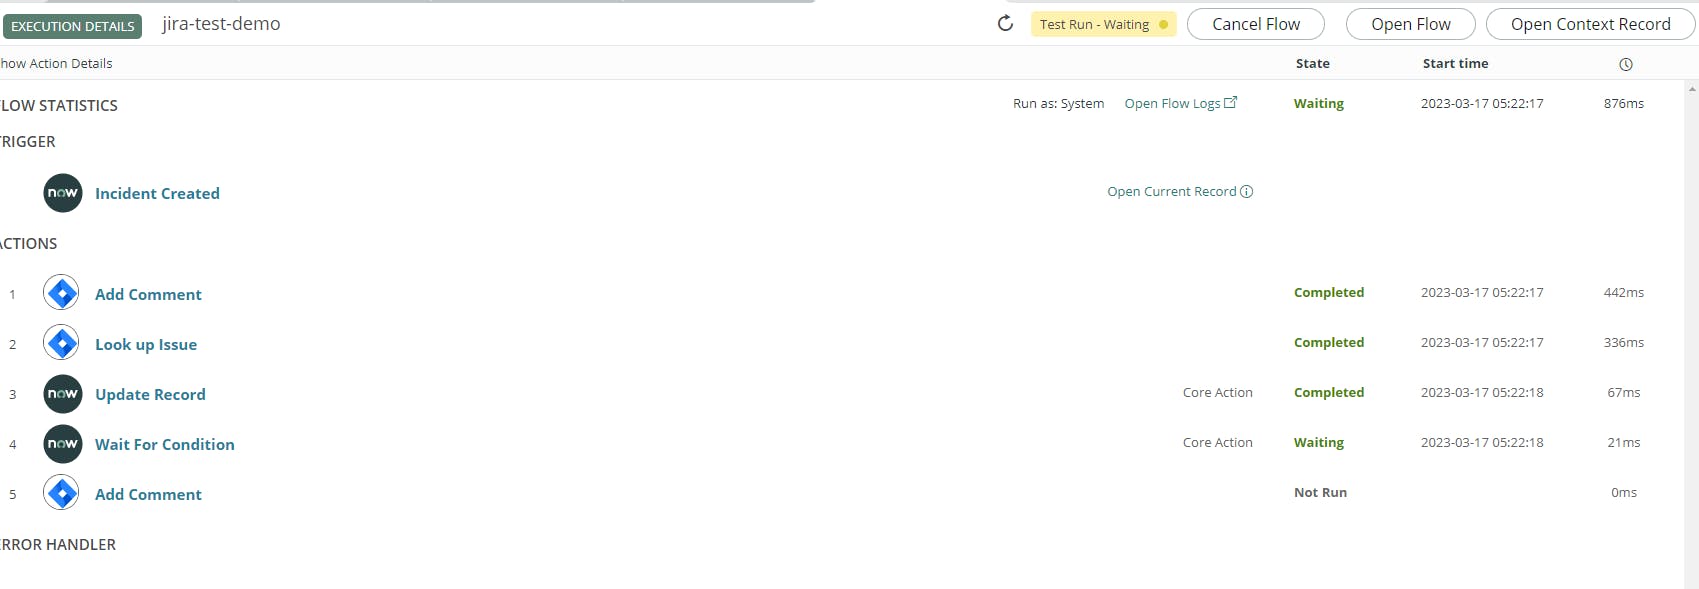
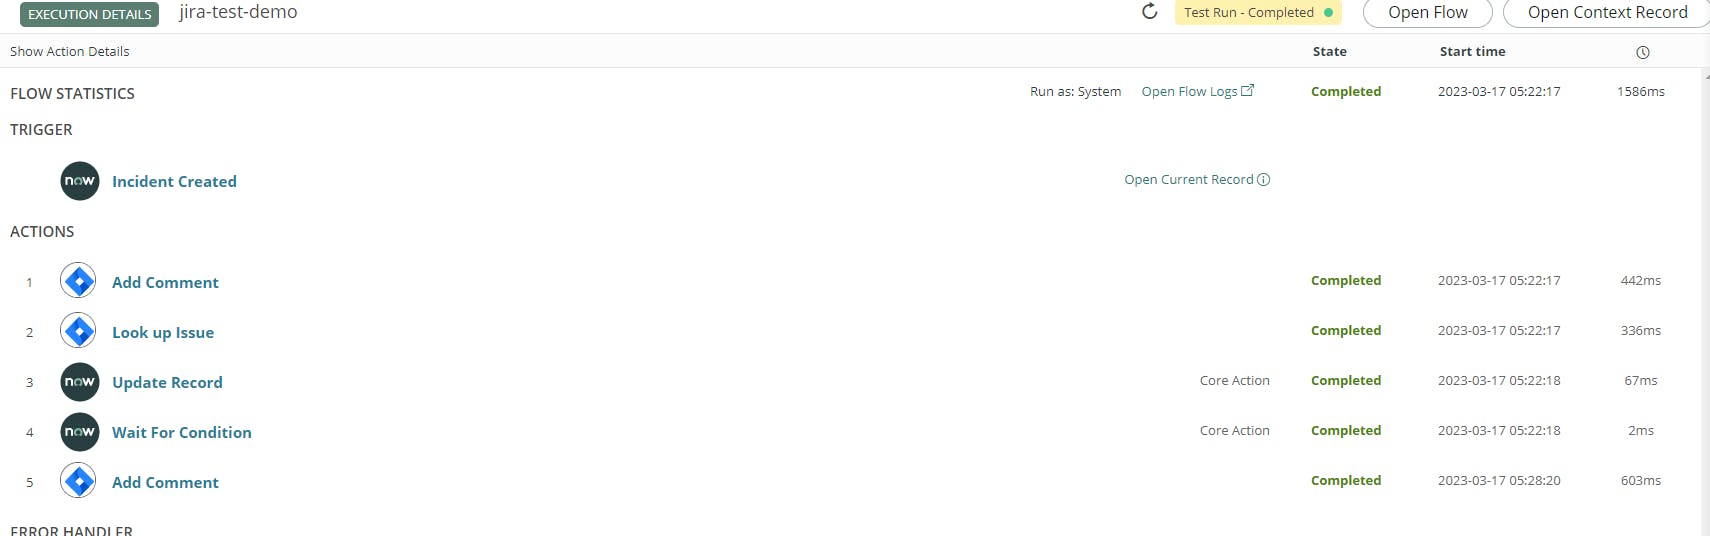
verify the execution logs of the flow:
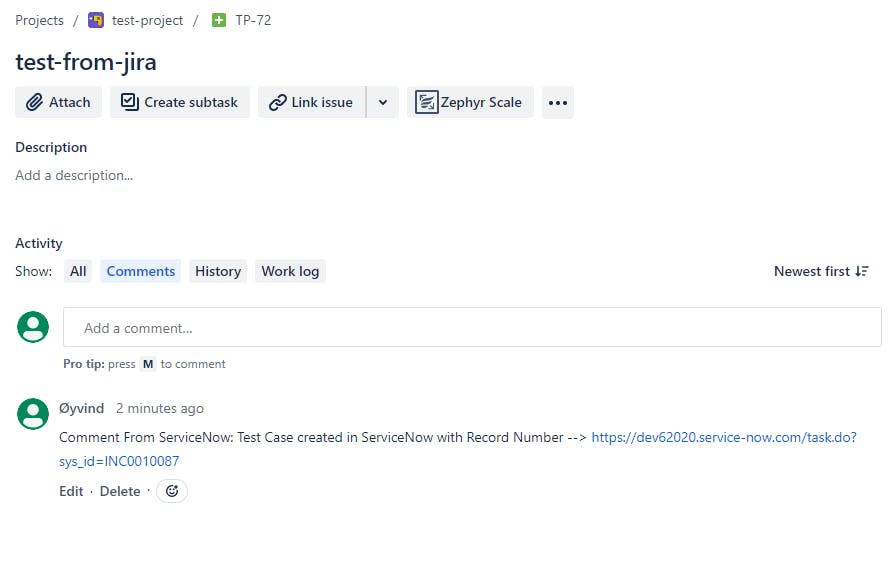
Finally, we can go into Jira to see the comment we predefined in our Flow:
The last action here is the Incident we just created passes back the validation that the Jira comment was sent

Some examples are provided below:
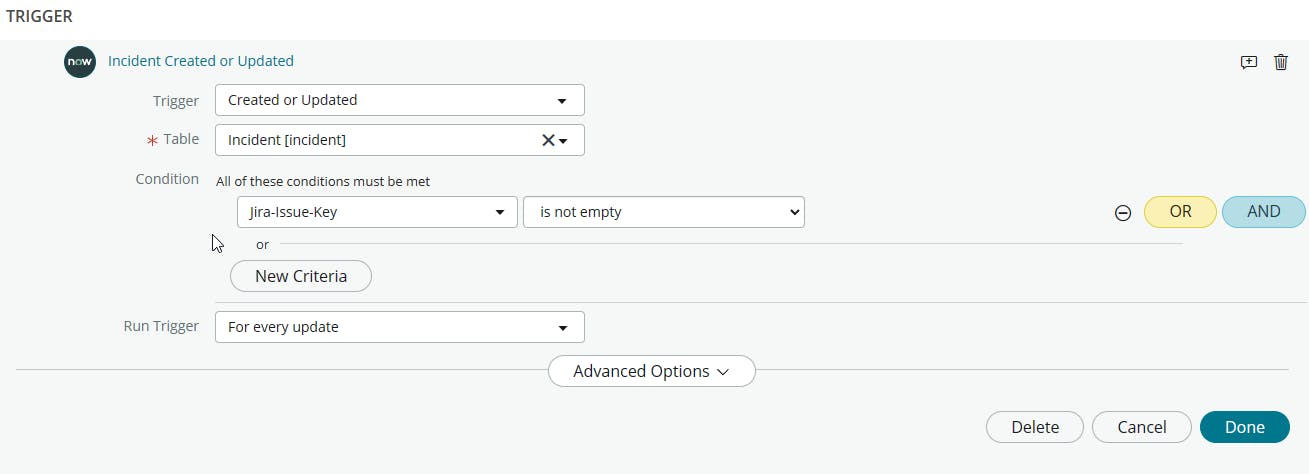
Whenever the Incident is created or updated, trigger the workflow
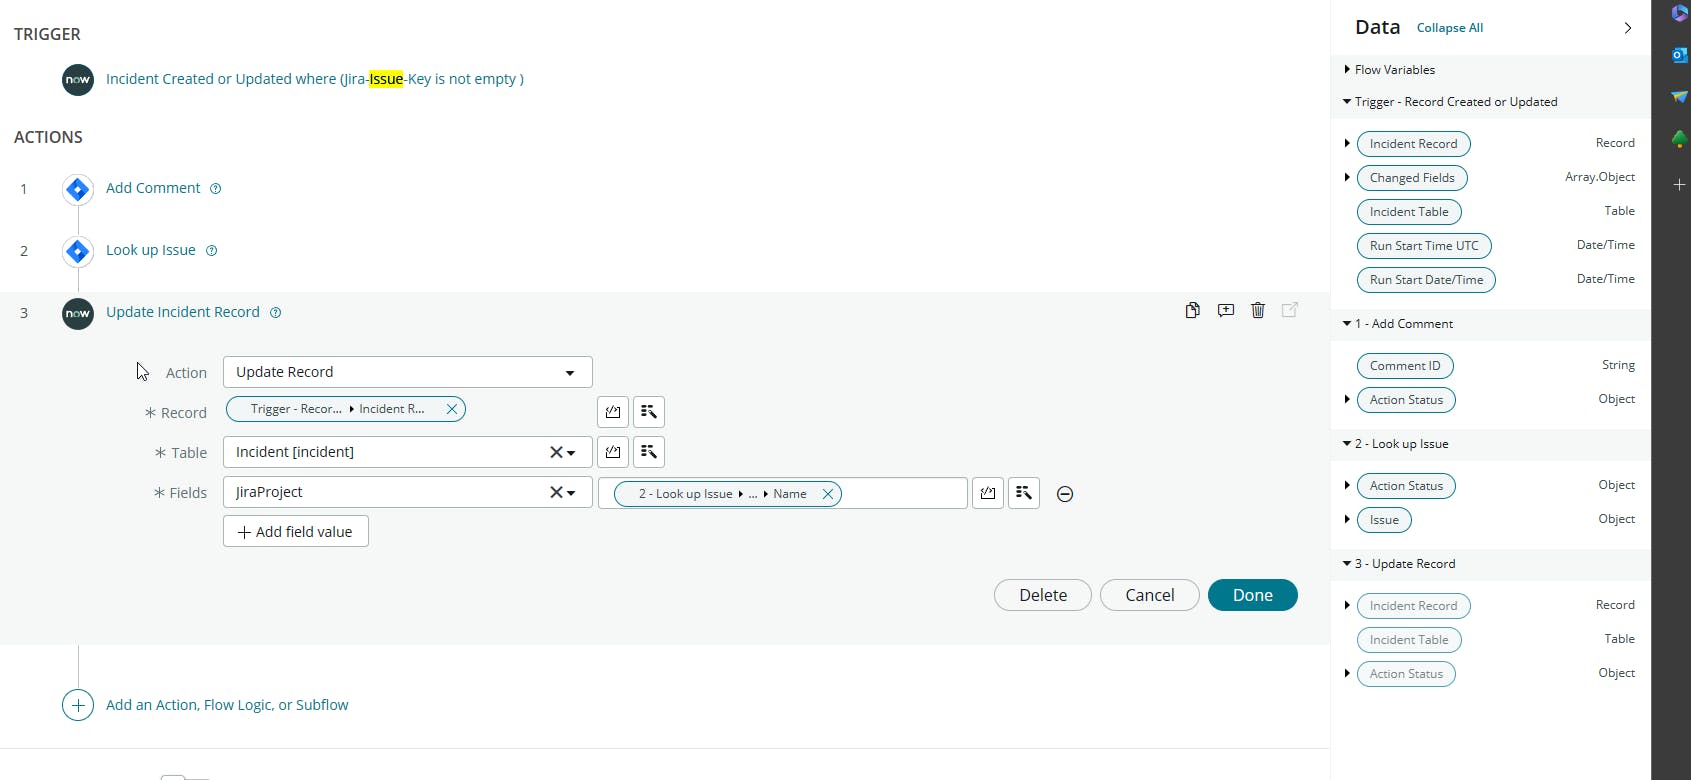
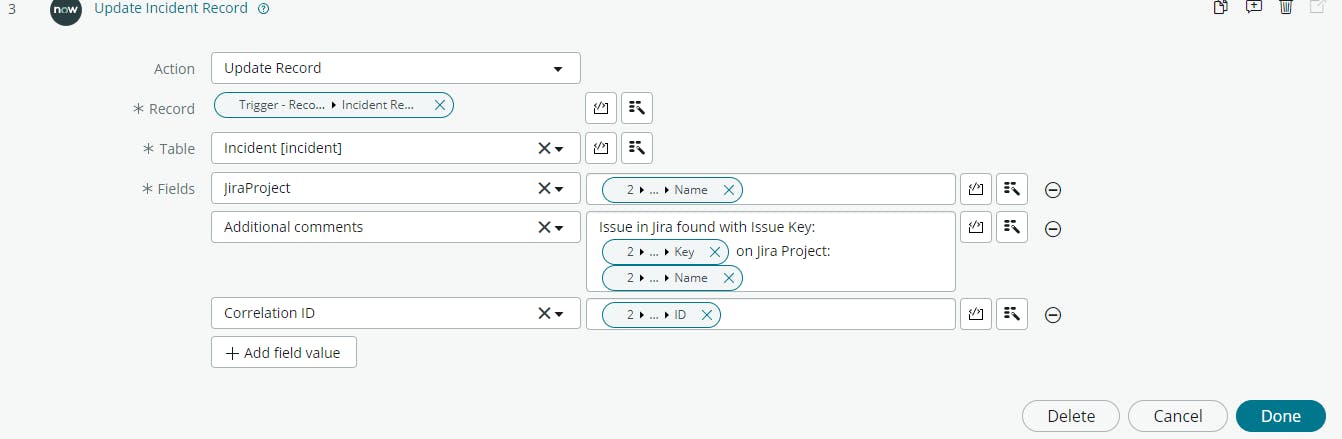
Retrieve a field from the look-up issue to fetch the project name, and add it to a different incident field.
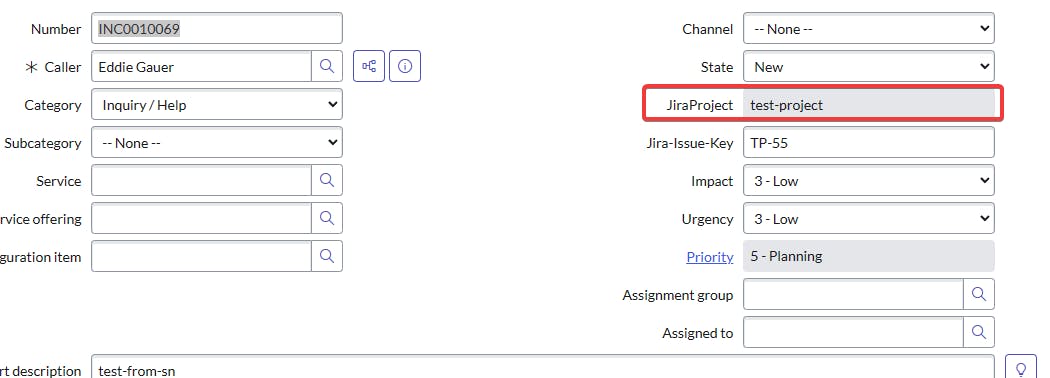
Verify the integration populates the Jira project name to the read-only field in ServiceNow:
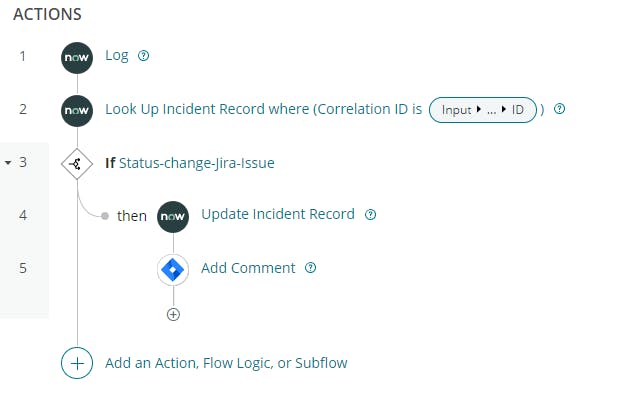
Walkthrough of flow
Trigger of the workflow is a newly created incident where the ServiceNow custom field Jira-Issue-Key is not empty.
Next up is commenting the Jira issue key specified in the incident. Posting an comment specifying the Incident number + a link
This action seems unrelevant at first, but I'll use the lookup issue action to retrieve some Jira data I'll later use in the flow.

Next up is updating the Incident record with some useful jira data like: Issue key and the Jira project. Also specifying the corrolation id that we have as the Issue ID. Please remember that the issue ID is not the same as issue key.
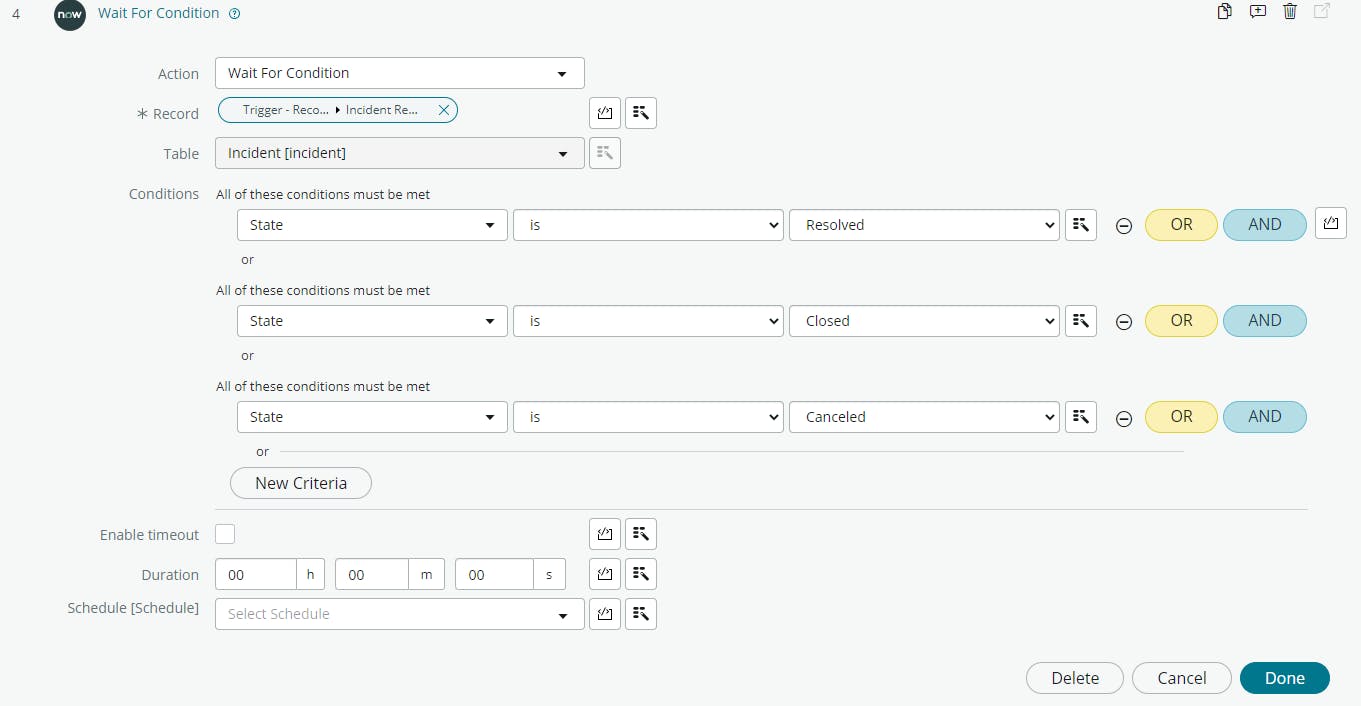
When the condition of the incident record change, in this flow it's the state of the Incident, It will not proceed to the next step in the flow before the condition is met.
Finally we're updating our Jira issue that we have specified commenting that the status have been changed in the record.

Create a Webhook in Jira and configure it in ServiceNow
So to send and listen on status changes or anything from Jira we would require to setup the webhook in Jira, to do so follow these simple steps.
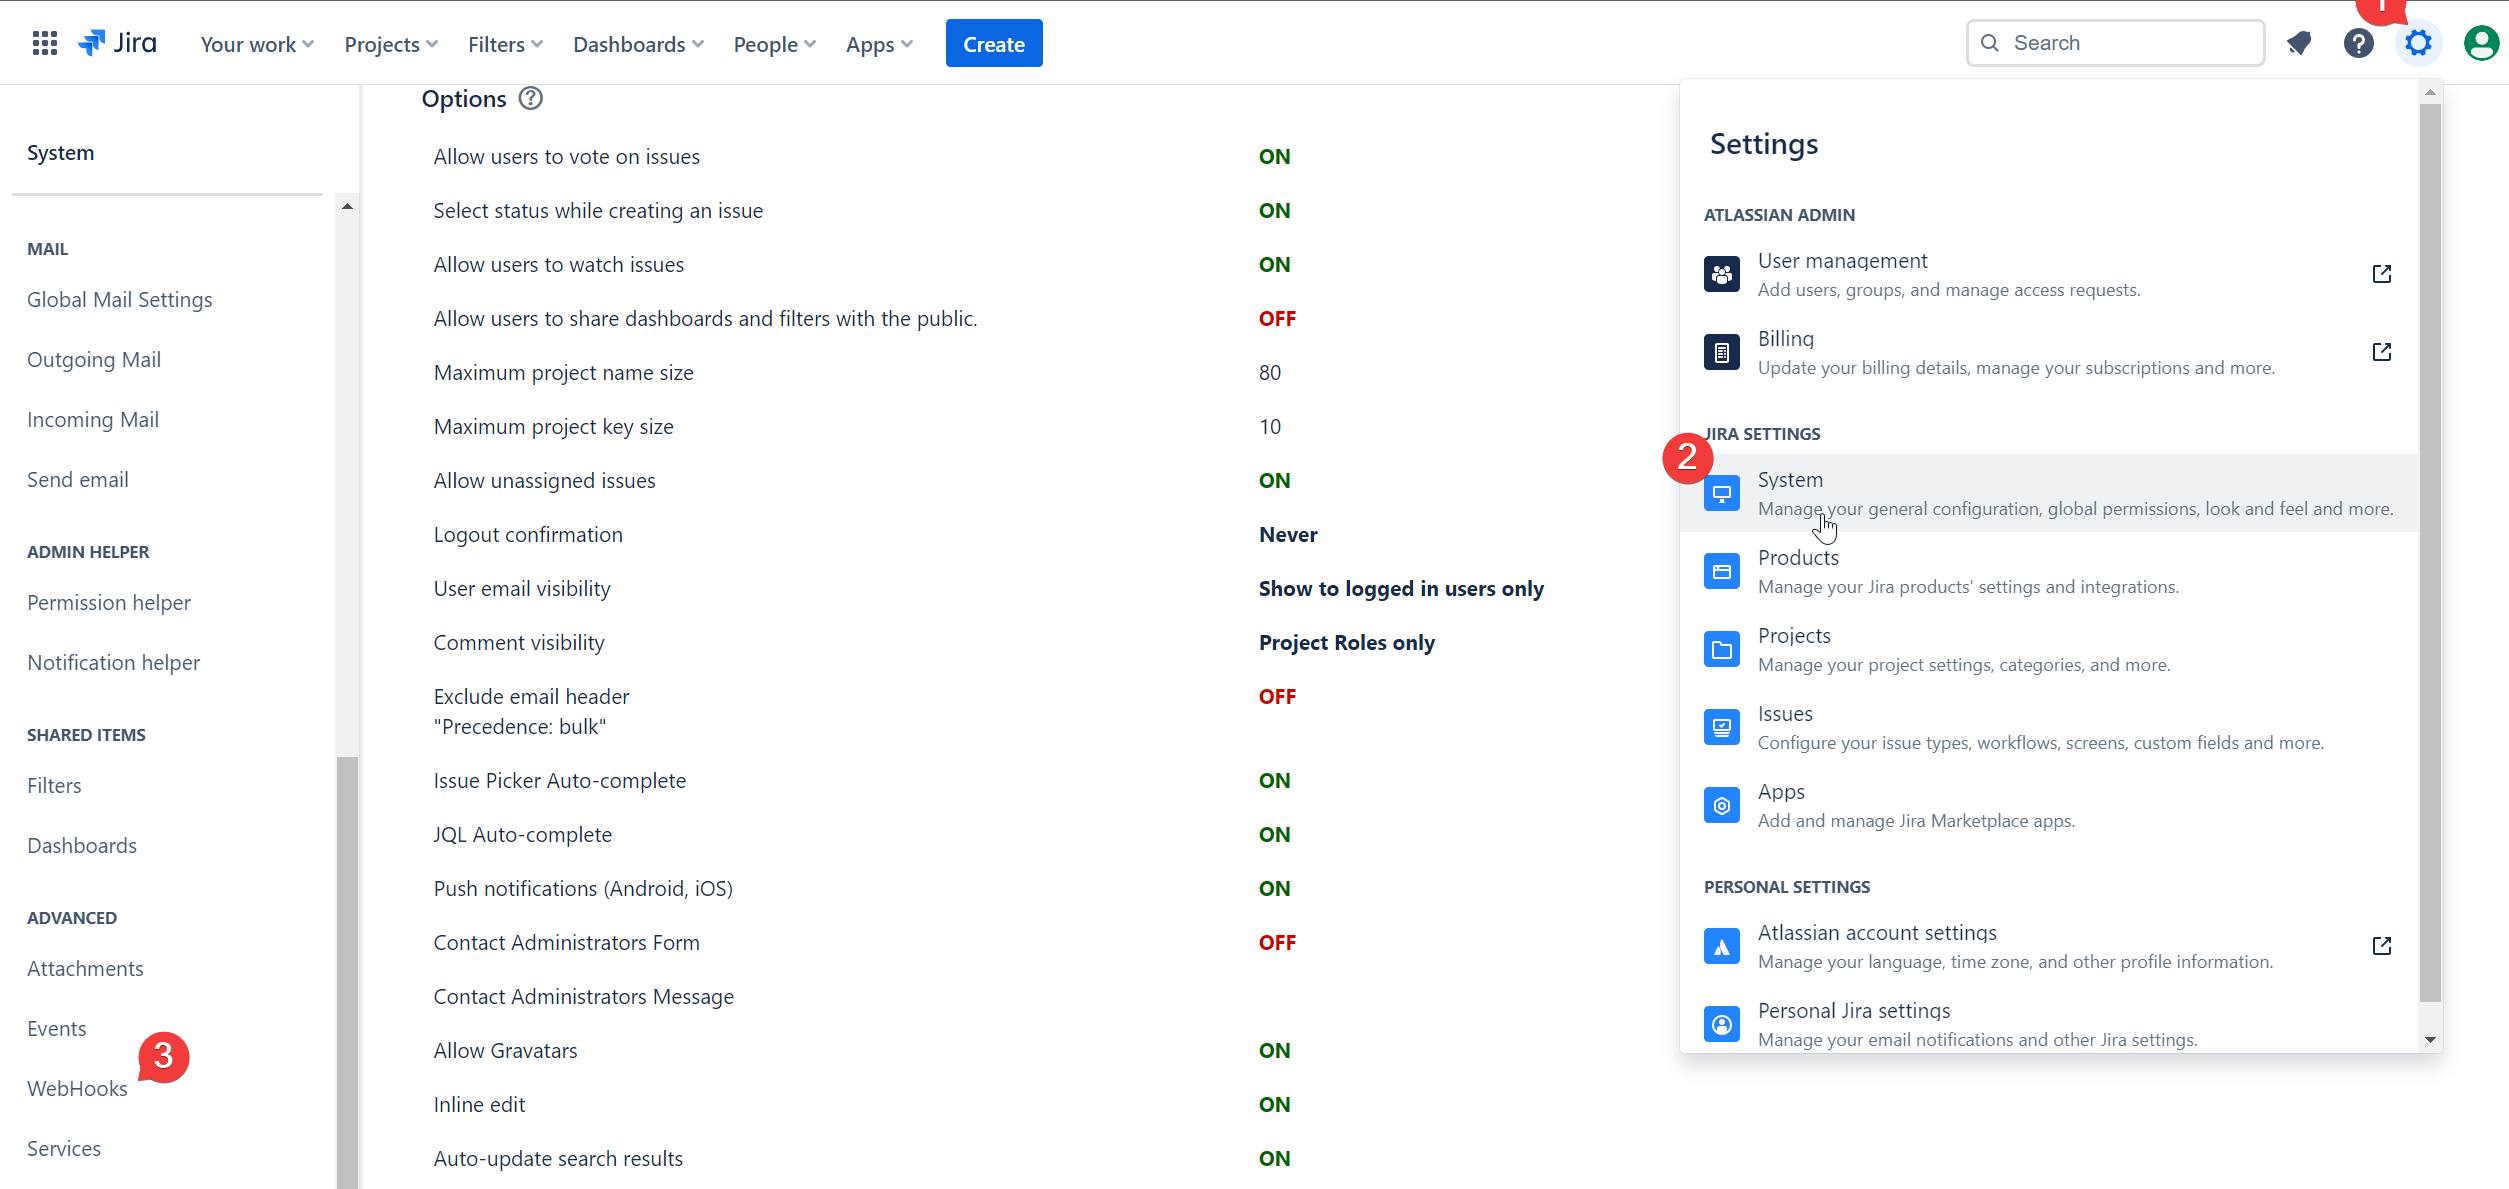
Login to your Jira cloud instance and press the settings button in top right corner --> system --> WebHooks
In the WebHooks panel click "Create a WebHook"
Next up we need to generate a Callback URL we'll use to fetch data back to ServiceNow. To do this please navigate back to ServiceNow and search for Jira Webhook registries. Click New --> write a generic name --> Description is optional --> Token we will use the default token named Jira Token, this could be anything though :

Click on the newly created Webhook registry record, I named my WebHook-From Jira. Then The call Back URL will be visible whenever you press CallBack URL. Copy this larger link back to jira.

Take the link and paste in the webhook creation:
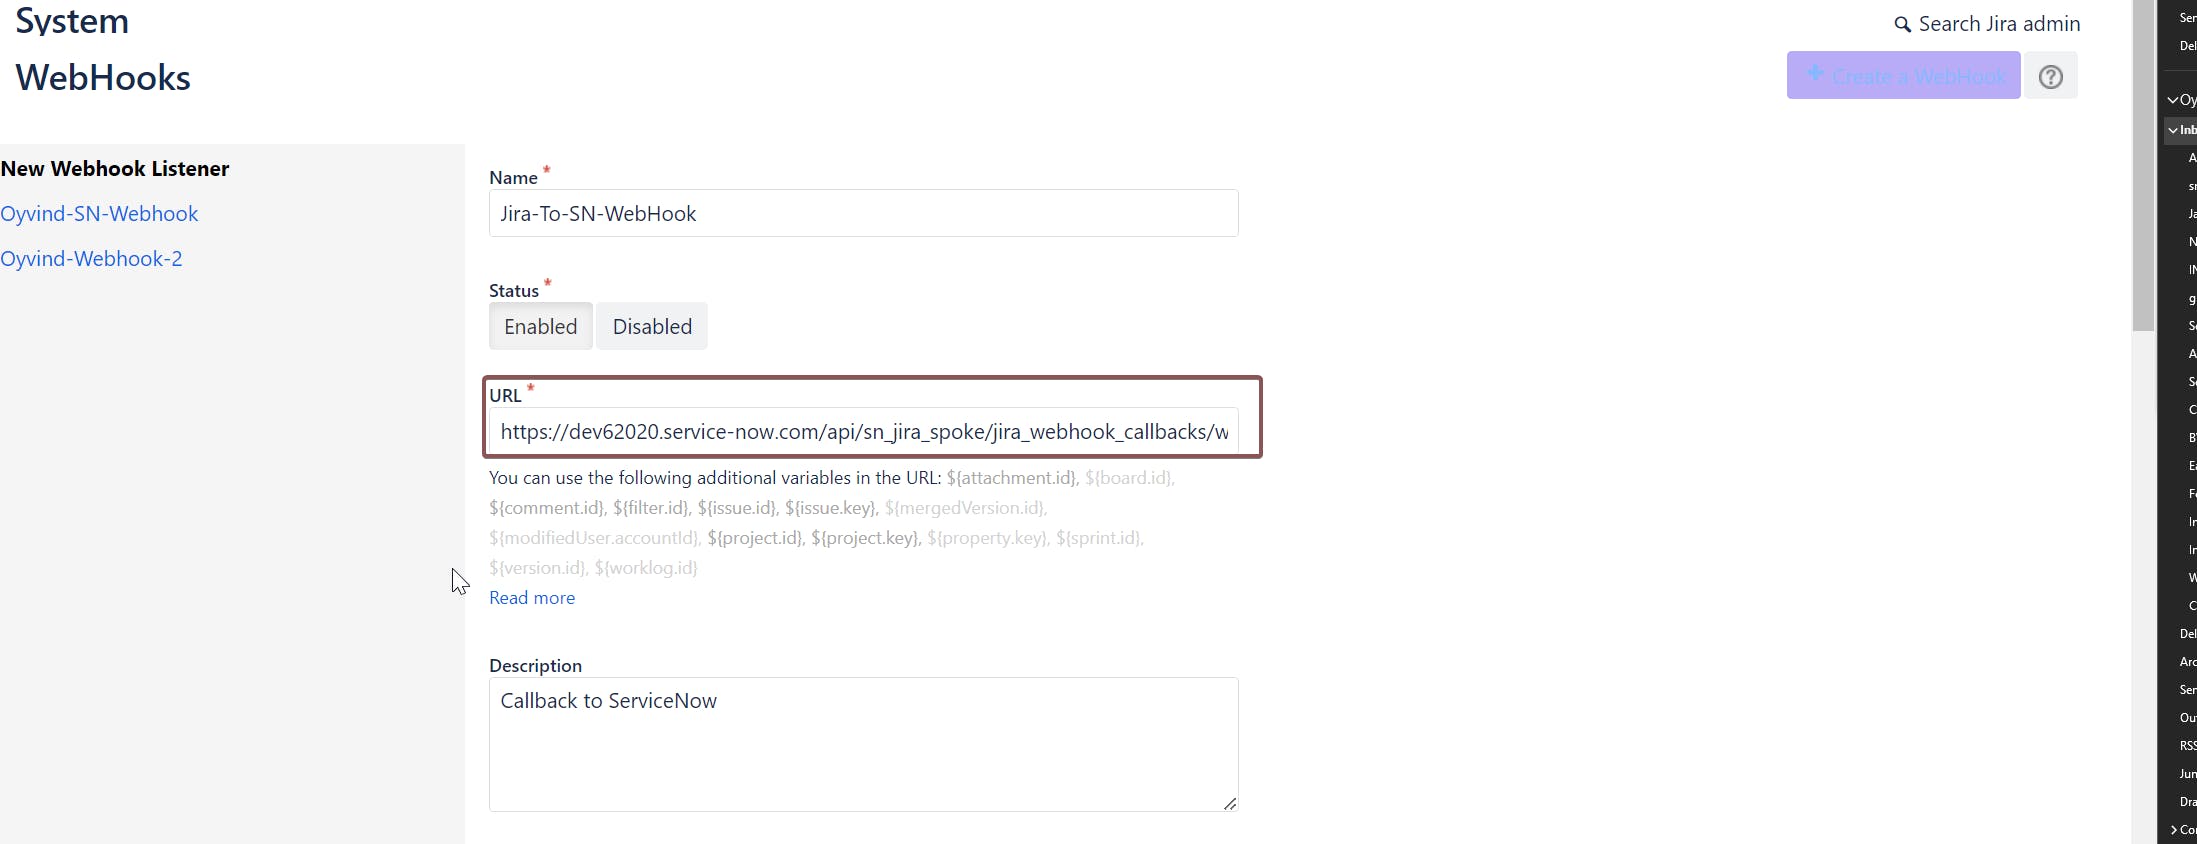
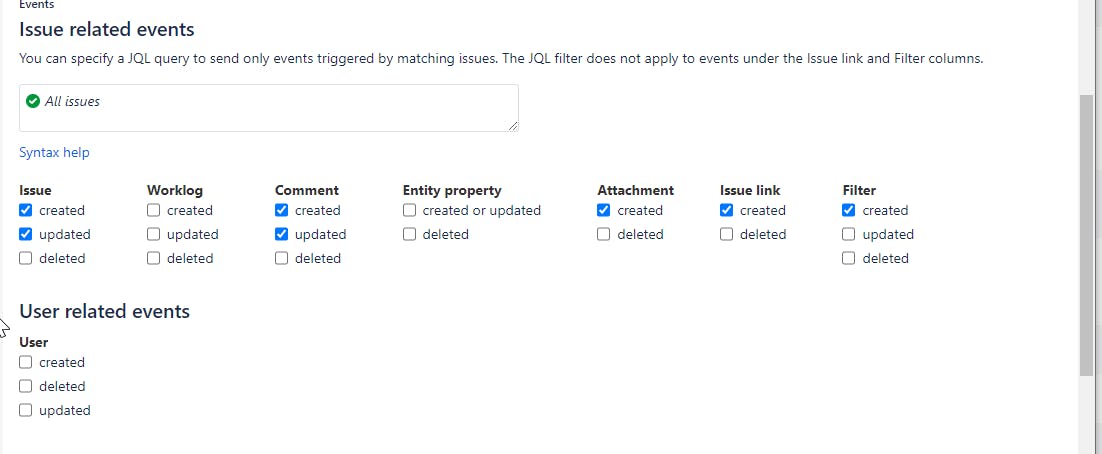
Add a scope for events you would like to make accessible over the webhook and in finally click create
Create a subflow to process the WebHook events
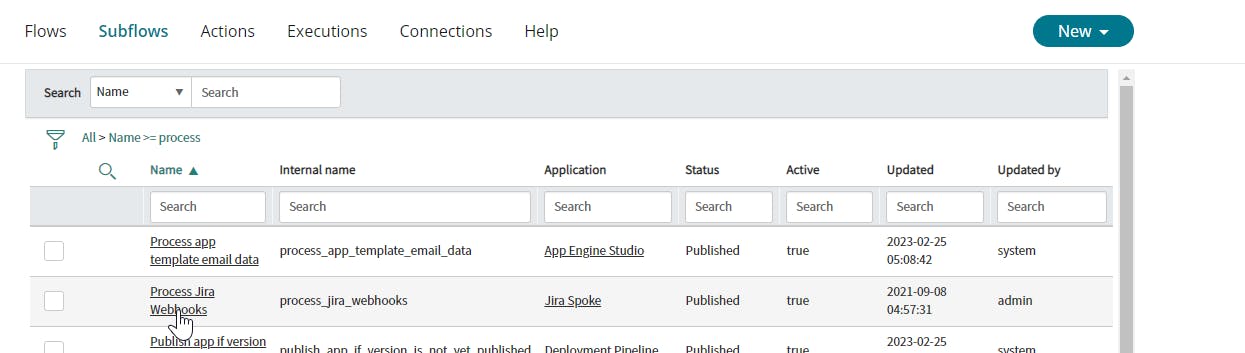
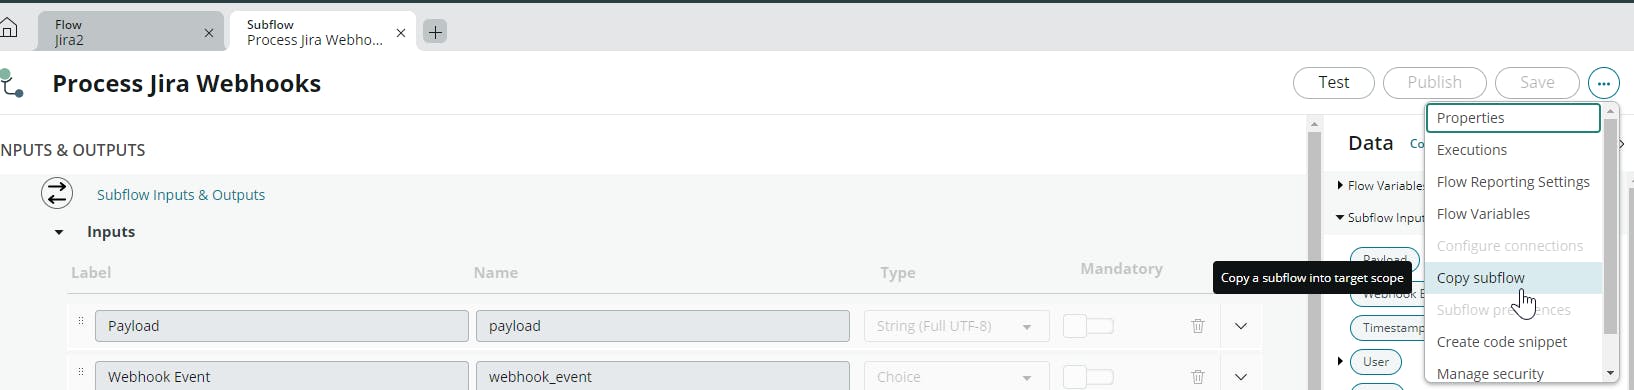
There is a default Subflow that processes Jira webhooks, what we will need to do is to copy the subflow called Process Jira Webhooks. What we will do is to copy this subflow.
Make sure you are in the Flow desginer --> Subflows, then proceed and click the Process Jira Webhooks
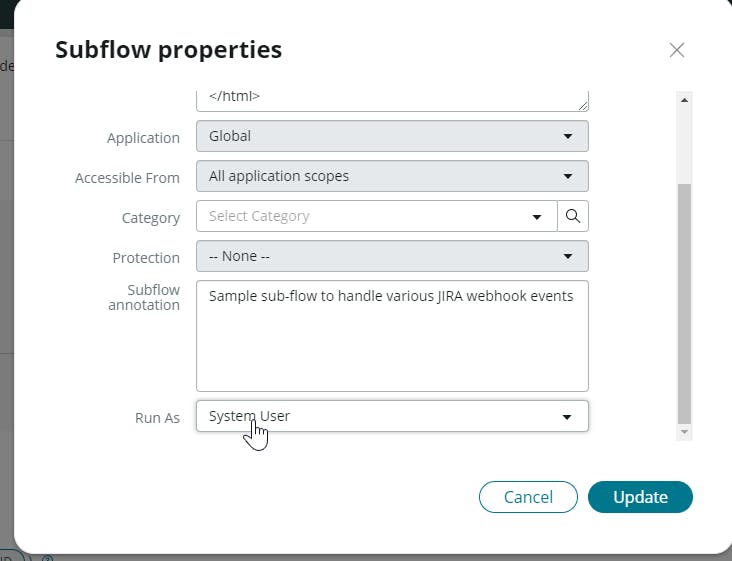
To copy the default jira webhook subflow, click the three dots and choose Copy subflow. Add a subflowname related to the jira-test-demo flow we created at a earlier stage. Make sure the application is set to global.
Purpose of this subflow is to handle incoming webhook events. and process the information we receive from Jira.
What we will start of by doing is to match the incoming Jira issue ID's with an correlation ID that we will be based on is the Jira-Issue-Key.
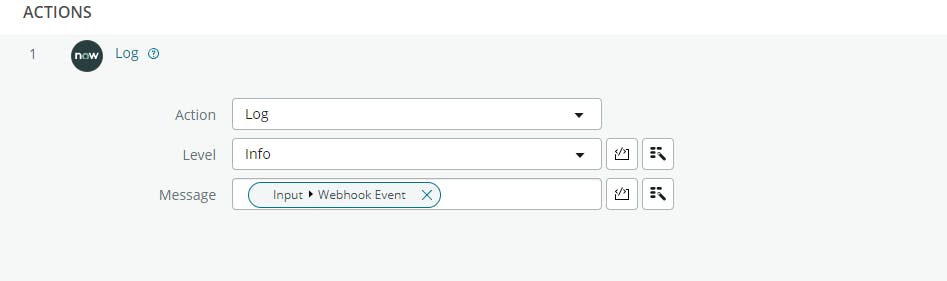
Next action we will add is the Update Incident record with some jira data that is fetched through the webhook. Click done when completed --> save --> publish
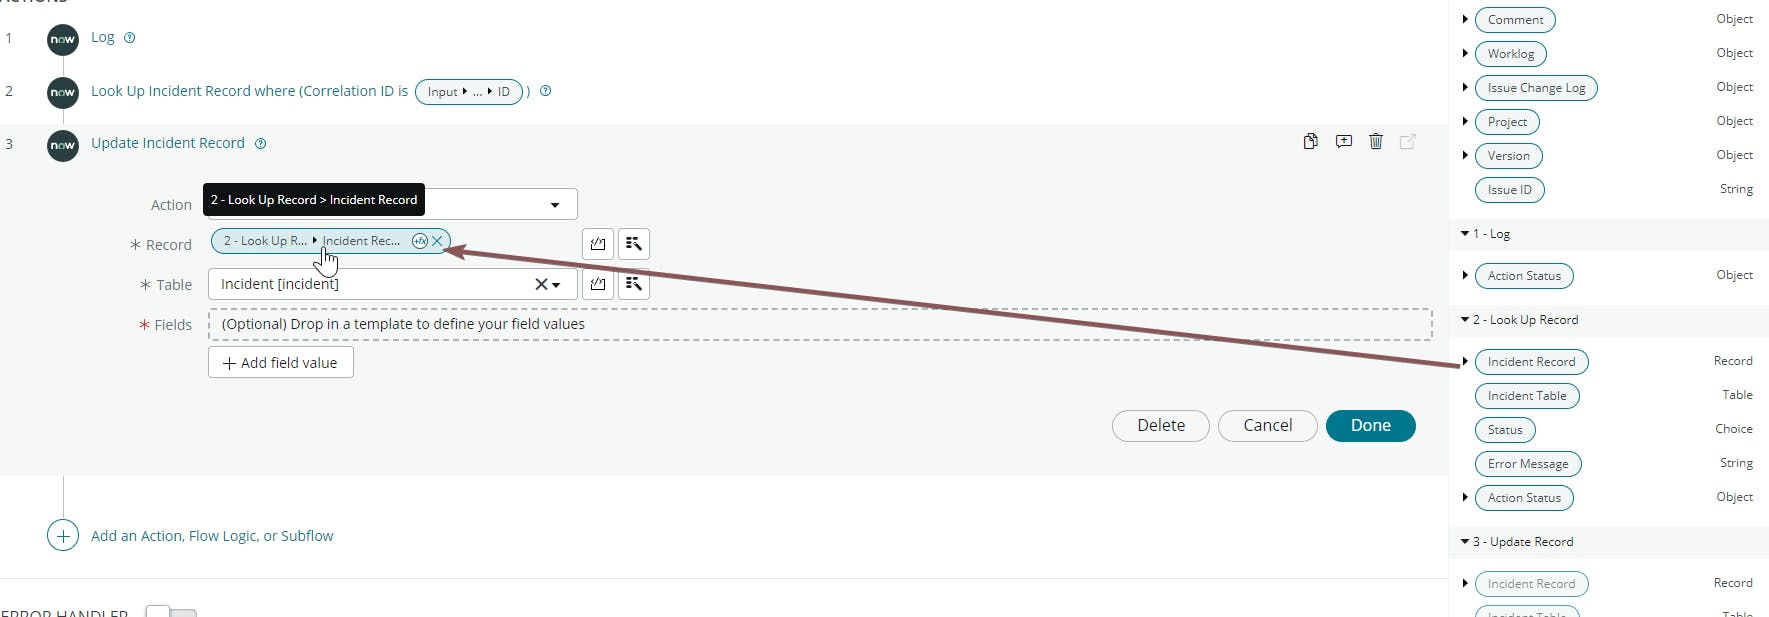
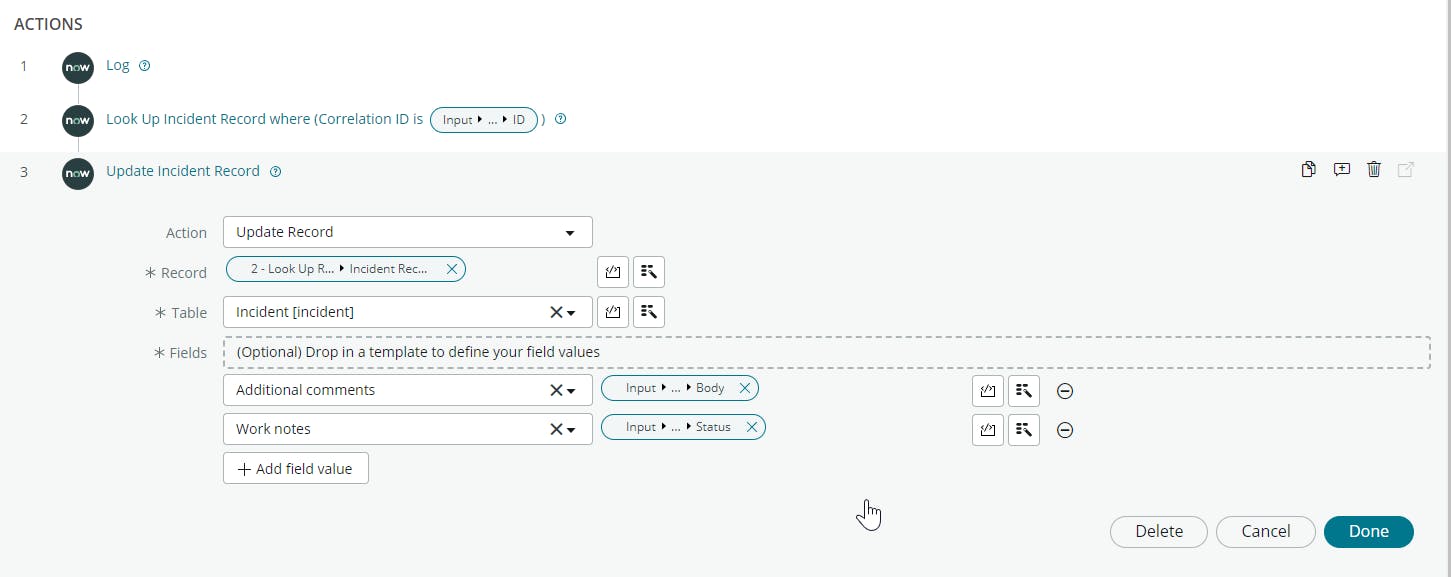
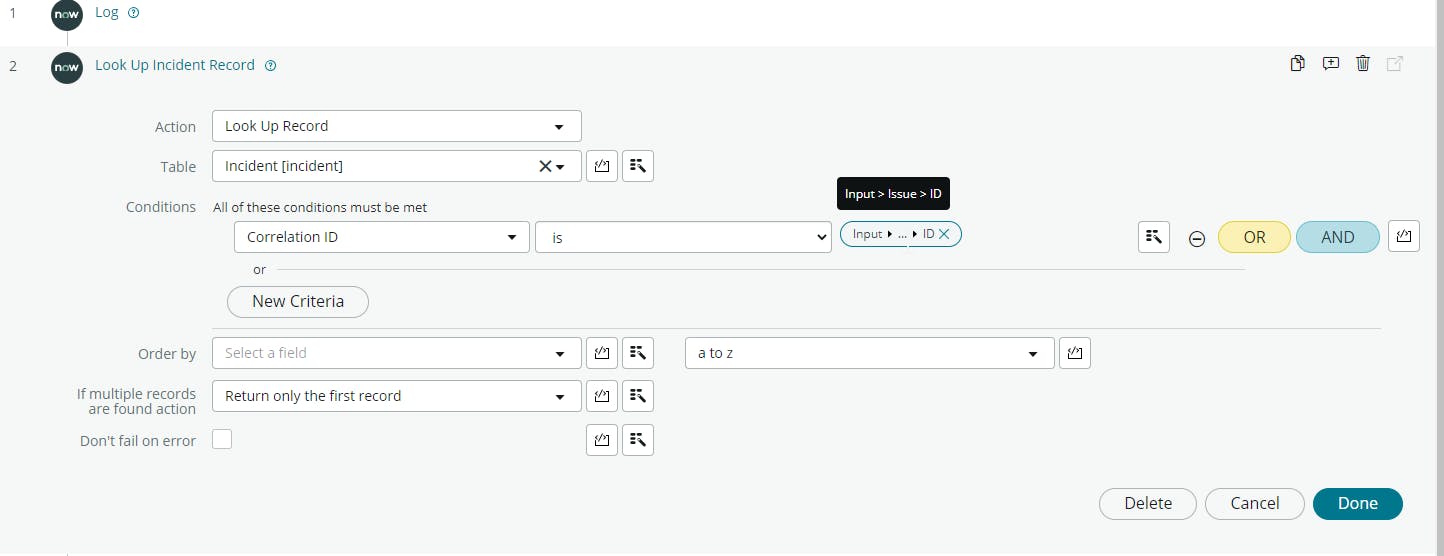
What we will do in this subflow is lookup the record where correlation ID matches(issue-key) and then update the Incident record with some comment + work notes.
Before we try our end-to-end flow we will need to update the the webhook handler on what subflow it should call. Remember the default Jira subflow, we'll have to change that to our subflow Jira-test-demo-subflow.
To update webhook routing, go to Jira WebHook Routing policies and click order 0.
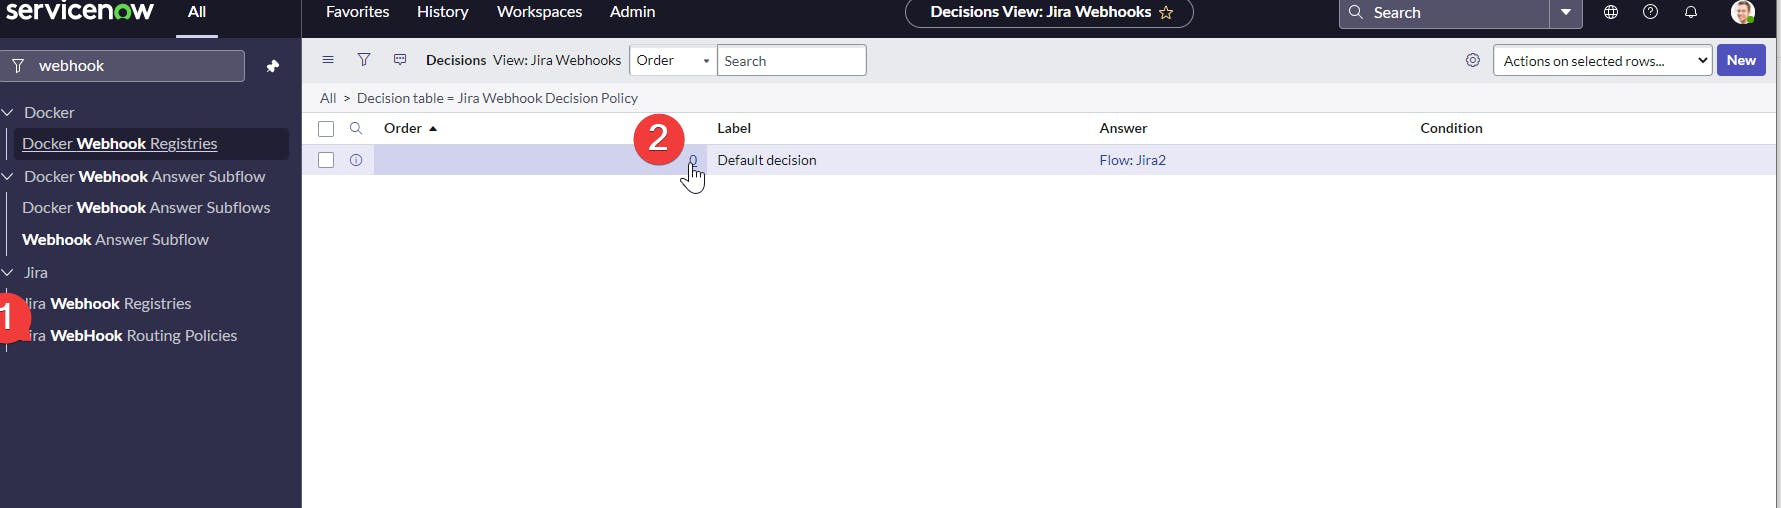
Change application scope to Jira Spoke and change the answer to our newly created subflow and click update.
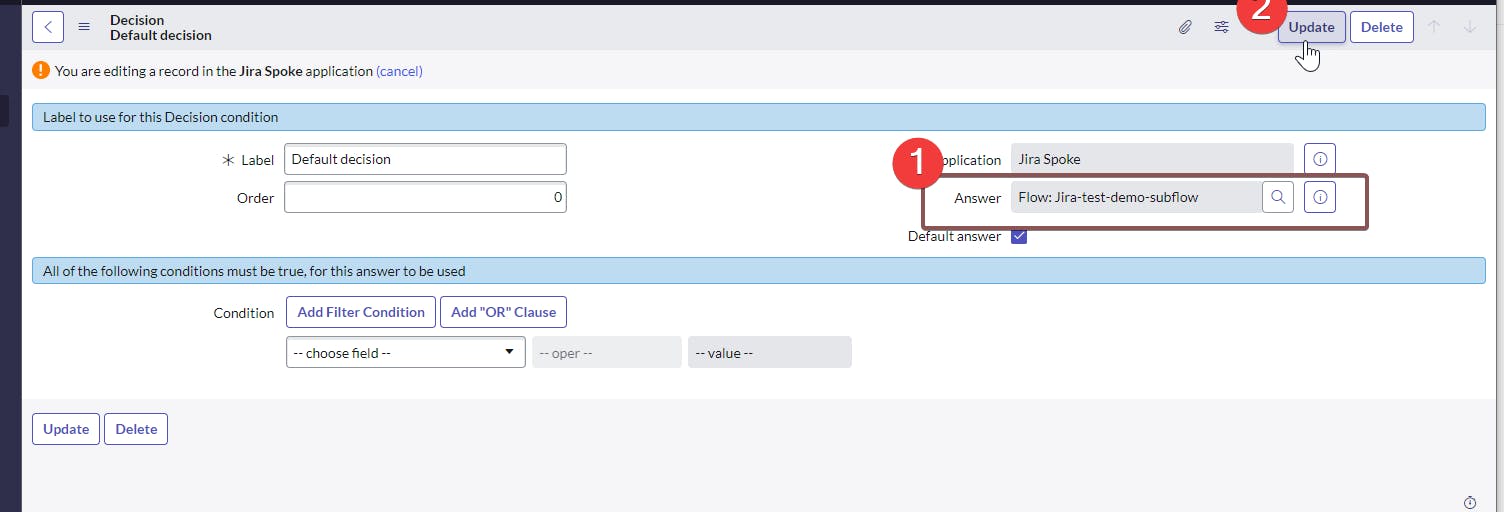
Last thing we'll do is the user running the subflow, this should be changed to System User --> click update and make sure your sublfow is published.

That's everything we have to do to create a bi-directional integration between Jira And service now. Next up is testing and make the integration bulletproof.
In detail this is how our final Subflow looks like:
It starts of by loggin the webhook event that is sent over to ServiceNow'
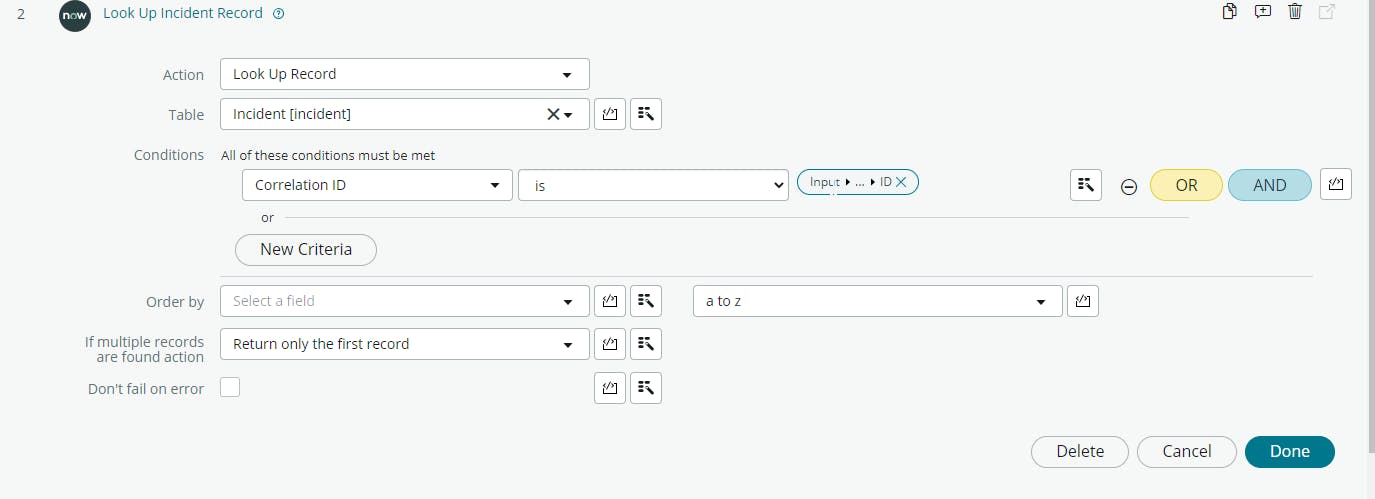
It then do a lookup on the correlation ID that we have specified in our flow, in our case the correlating ID is the Jira issue ID:
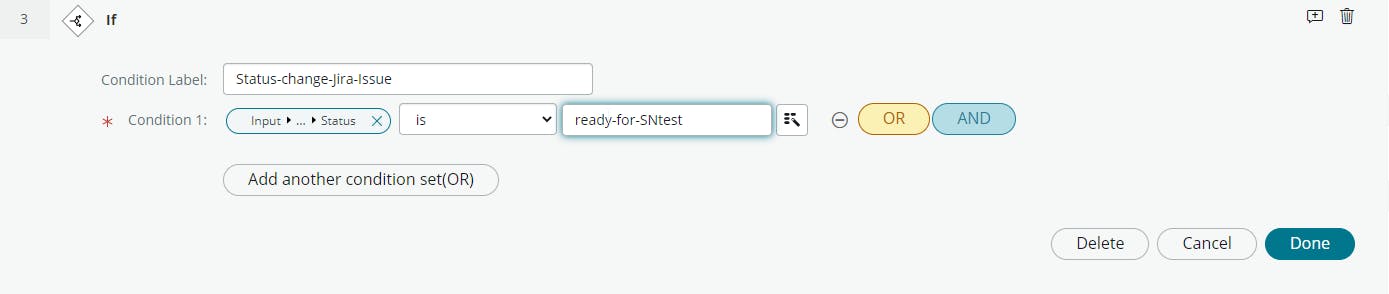
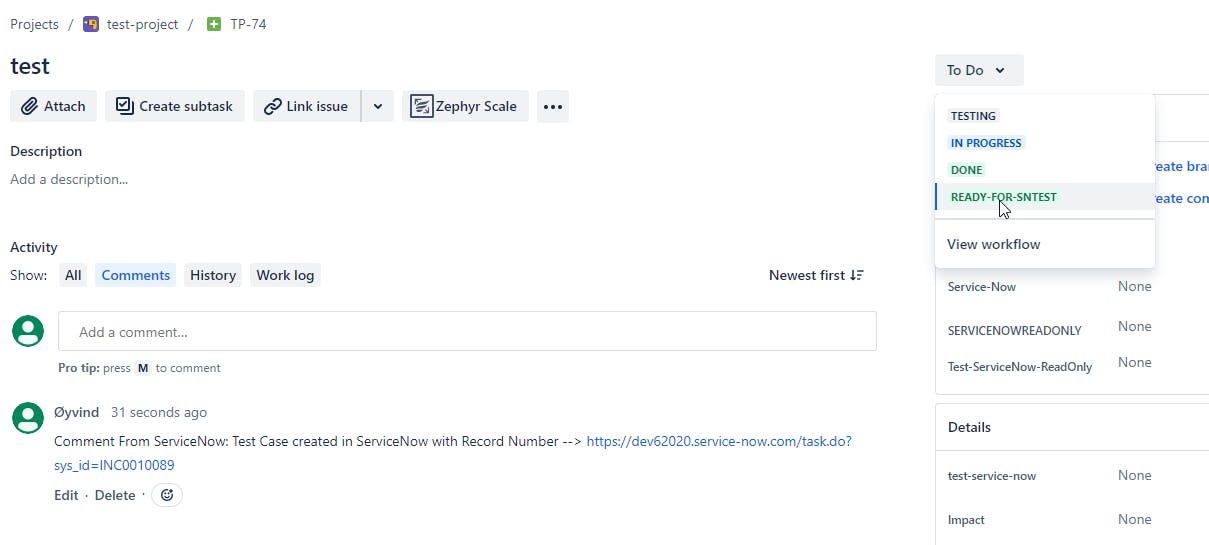
Next up we are waiting for a specific jira condition to be met, in our case that is when the Jira issue status is "ready-for-SNtest", but it could be on any issue status changes.
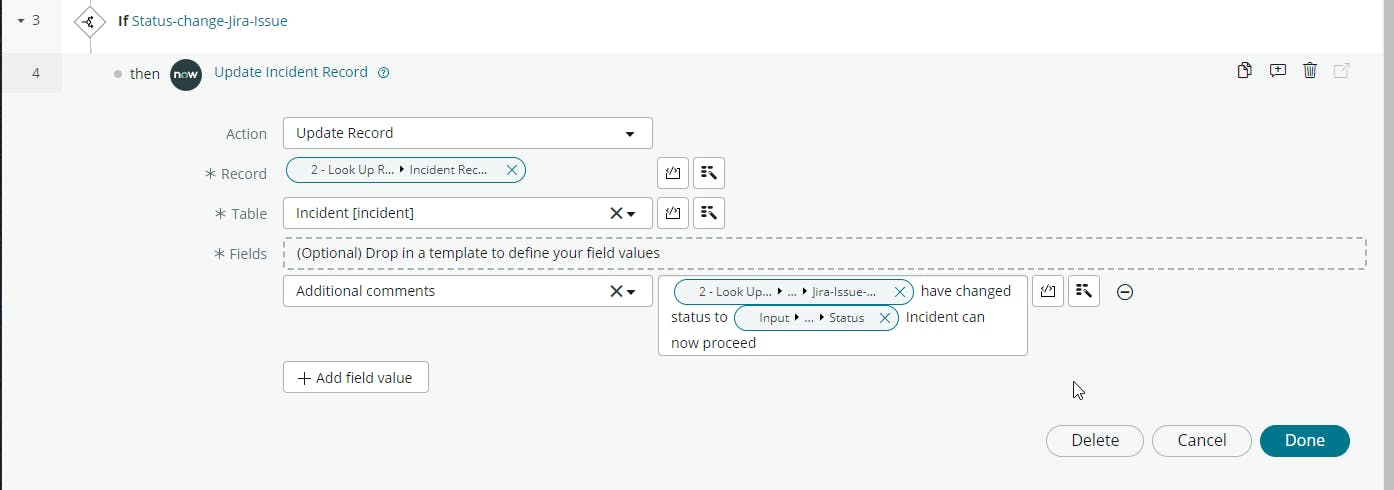
When the "if" condition is met, the subflow will both post an comment in the incident record.
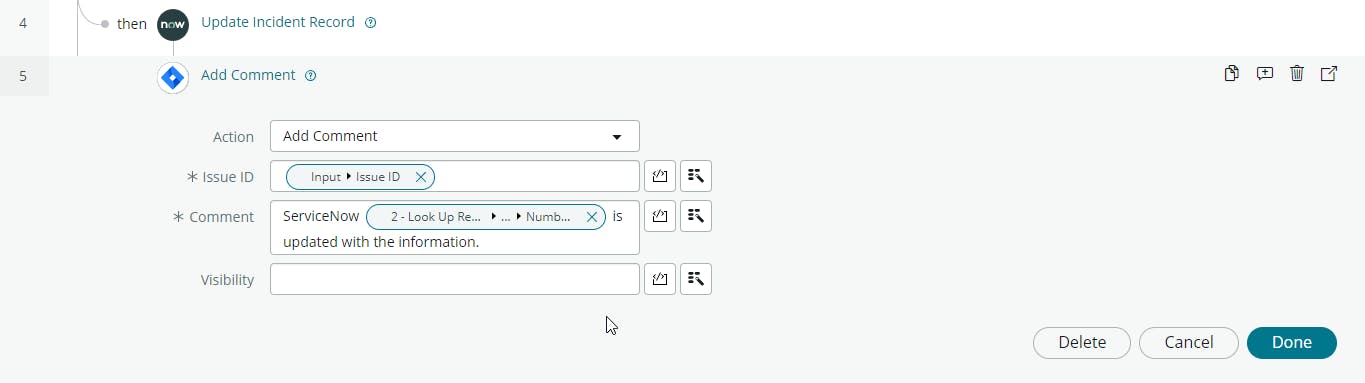
Finally, the last thing is to post a verification comment back to the Jira issue.
end-to-end subflow
Testing the integration between ServiceNow <--> Jira
Finally, we're on the step to test the integration. To start we will start by triggering our main flow, this trigger is whenever an Incident is created and the Jira Issue key is specified in the incident record. prerequisite is having a Jira issue key available to use.
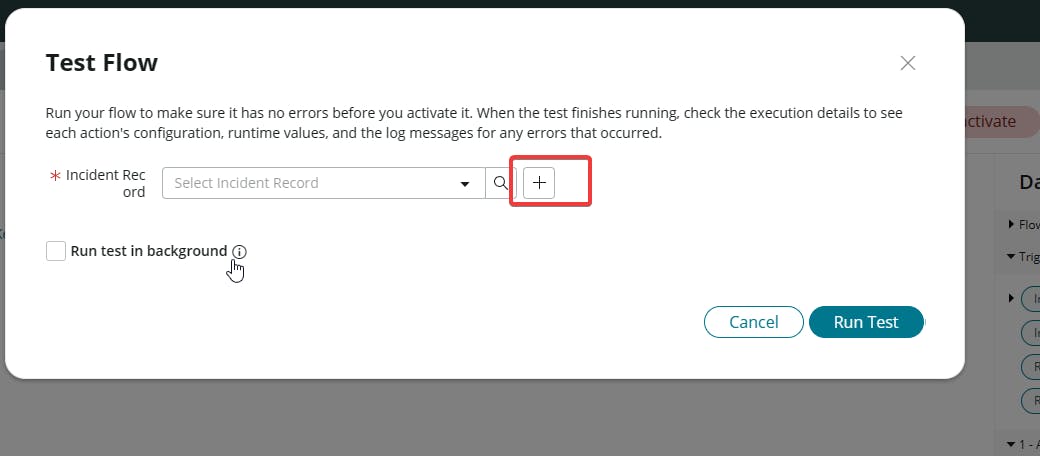
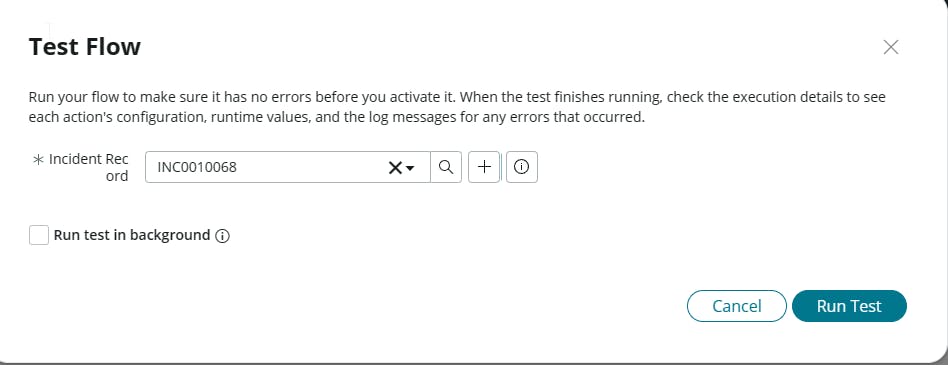
Navigate to flow designer and our main flow: jira-test-demo and click test. in the new window that pops up, press + and add the Jira issue key.
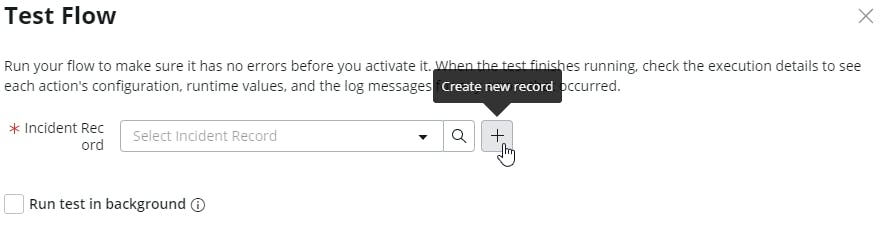
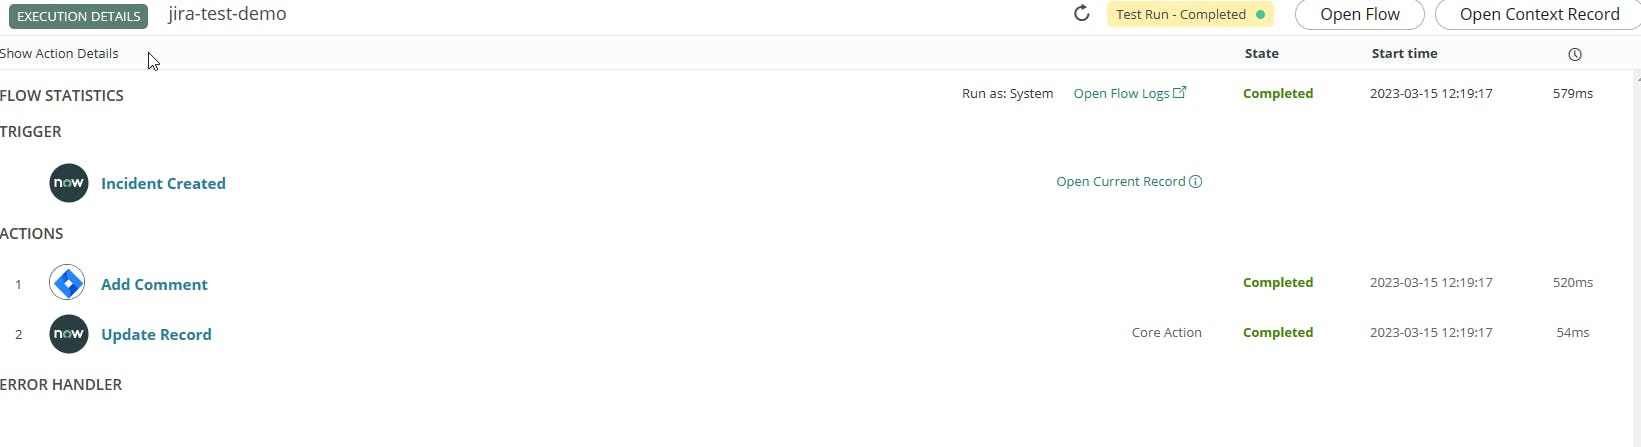
Click submit after the mandatory fields are filled and click Run Test. Once the test is complete you can either look at the Incident record created, the jira issue. Or verify the execution details. note that the flow is not 100% as it's waiting for state change in ServiceNow.

Can verify that the execution was successful in both ServiceNow and jira
if I go into the Incident record and change the state I'll see the result of the whole flow turn to completed.
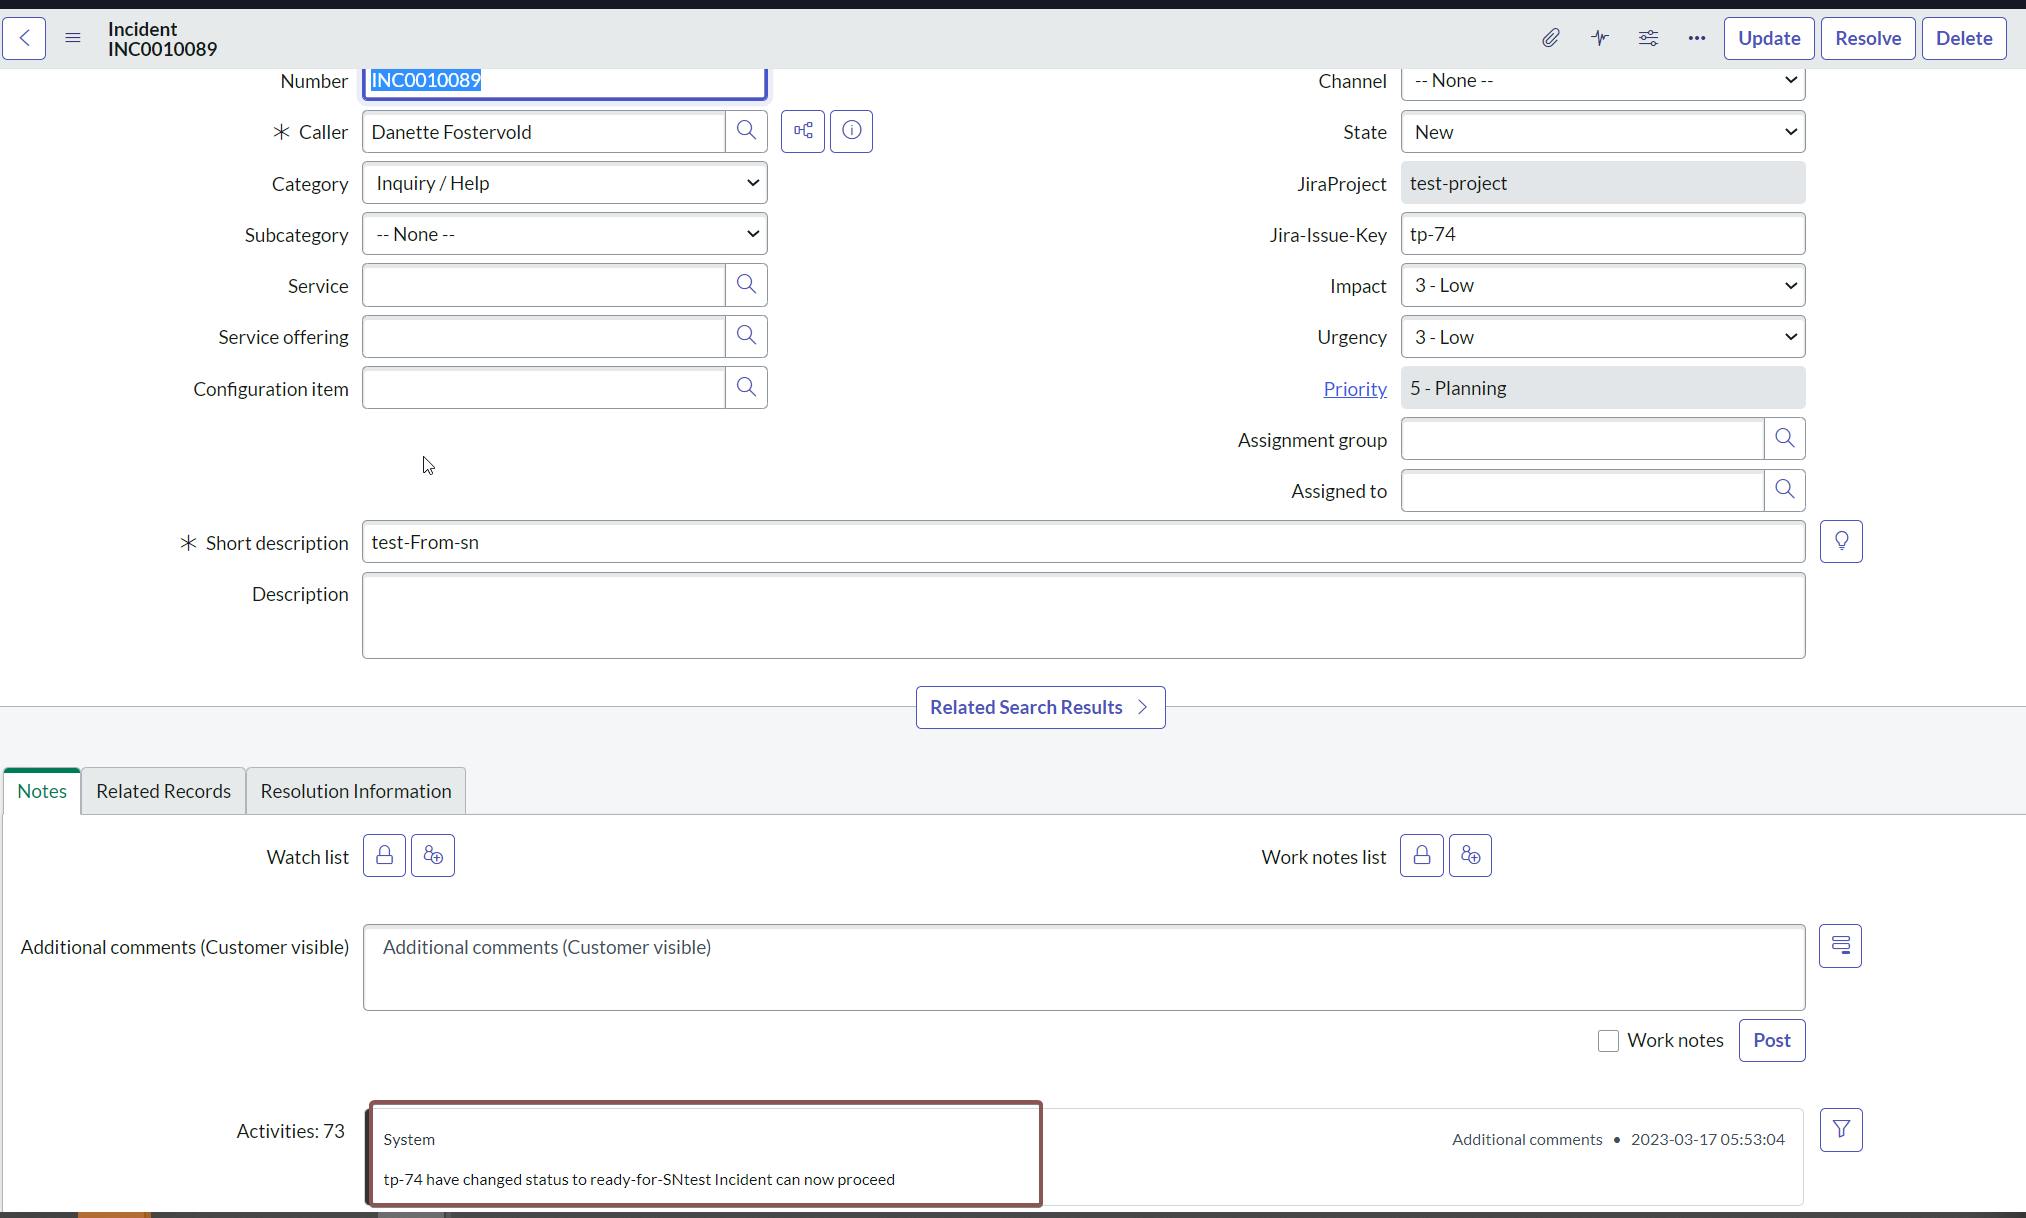
Testing the subflow
So in the previous section we tested the main flow. But what about the subflow, updating the incident record with useful information based on the issue key we pass along the Incident. So what we will do is to change the status on the Jira issue TP-72, and see that the INC record get's updated.
Open the Jira issue and change the status of the issue.
After you change the status in Jira, the ServiceNow incident record will be updated quite rapidly.